介绍
在数字时代, LED显示屏 have become an important carrier of information transmission and visual display and are widely used in commercial advertising, conference exhibitions, sports events, and other fields.
With the development of technology, mobile phones, as indispensable smart devices in our daily lives, are becoming more and more powerful, and the linkage with LED display screens has become closer.
This article takes Viplex Handy as an example to teach you how to use mobile phones to control the content of LED display screens! It allows you to easily realize the remote control of the LED display screen by mobile phone.
1. Preparation
Before officially using mobile phones to control LED display screens, we need to do a series of preparations to ensure that the entire control process can proceed smoothly. The following are the detailed preparation steps:
1). Confirm device compatibility
- LED display screen compatibility:
First, you need to confirm that your LED display screen supports a wireless network connection.
This means that the display screen needs to be equipped with a wireless receiving module or a wireless control card so that it can communicate with external devices through wireless methods such as Wi-Fi.
Make sure the firmware or software version of the LED display screen is the latest to maintain the best compatibility with Viplex Handy software.
- Mobile phone compatibility:
Check whether your mobile phone model is in the support list of Viplex Handy software. Generally, most mainstream smartphones (such as iOS and Android phones) are compatible with the software.
Make sure your phone’s operating system is the latest version for optimal performance and security.
2). Network connection
- Wireless router settings:
Make sure your wireless router is turned on, and the network signal is stable. If possible, try to place the wireless router close to the LED display and the phone to reduce signal attenuation.
Set an easy-to-remember and secure wireless network name (SSID) and password so that you can enter it quickly and accurately during subsequent connections.
- Device connection:
Connect the LED display’s wireless receiver to a power source and make sure it is properly configured to connect to your wireless network.
Open Wi-Fi settings on your phone, search and select the wireless network name you set previously, and enter the password to connect. Make sure both the phone and the LED display are connected to the same wireless network.
3). Download and install Viplex Handy
- Download software:
Open the app store on your phone (such as the Apple App Store or Google Play Store).
Enter “Viplex Handy” in the search box to search.
Find and click the download button and wait for the software to download.
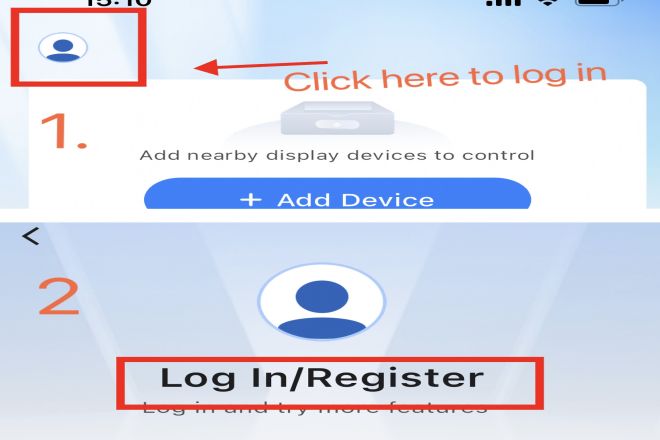
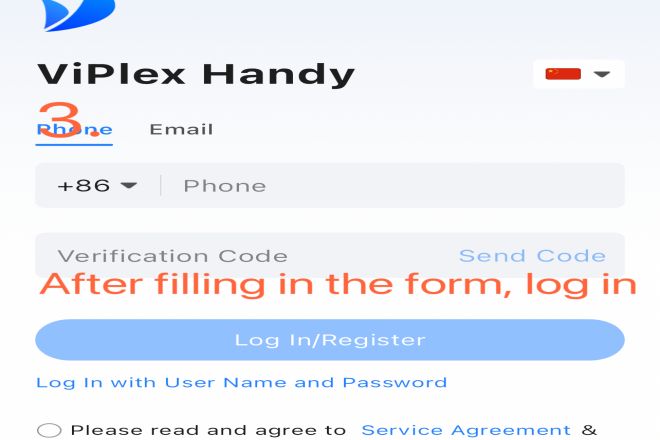
- Installation and Registration:
After downloading, click the Install button to start installing the Viplex Handy software.
During the installation process, please follow the instructions on the screen.
After the installation is complete, open the Viplex Handy software. If it is your first time using it, you may need to register or log in according to the software prompts. If you already have an account, just log in directly.
After completing the above preparations, you can start using the Viplex Handy software to control the LED display. Next, we will enter the steps of software settings and device pairing.
2. Software Settings and Device Pairing
After completing the preparations, the next step is the setting of the Viplex Handy software and the pairing process of the LED display device. This is the key step to achieve mobile phone control of the LED display.
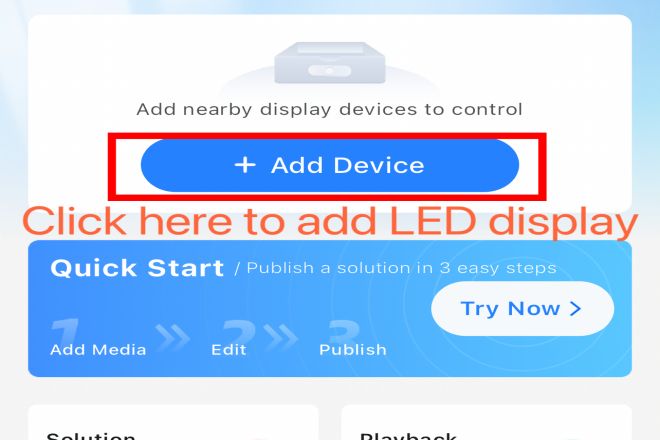
1). Open Viplex Handy
Start the phone, find, and click the Viplex Handy application icon to enter the main interface of the software. On the main interface, you may see some basic operation options and status displays.
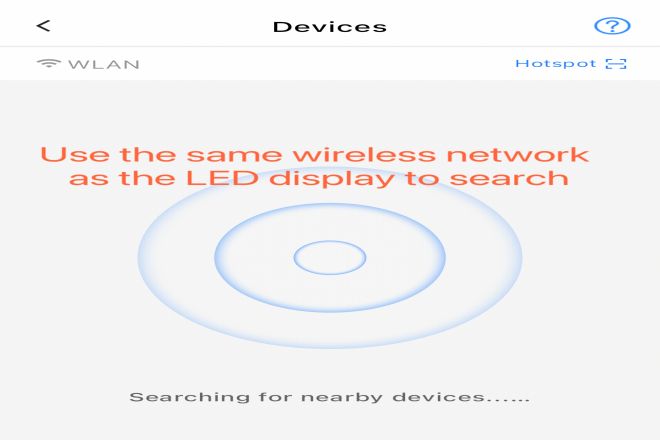
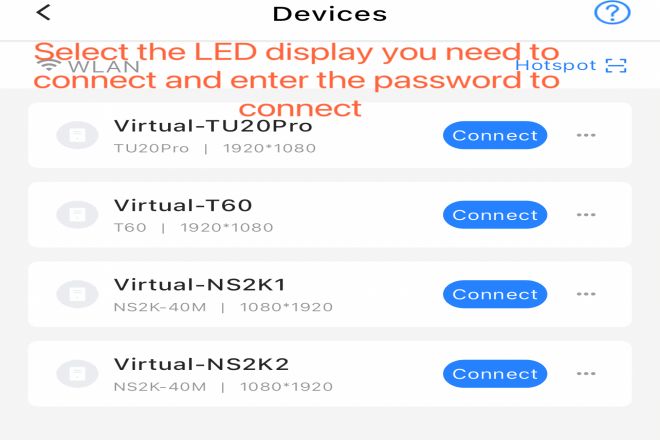
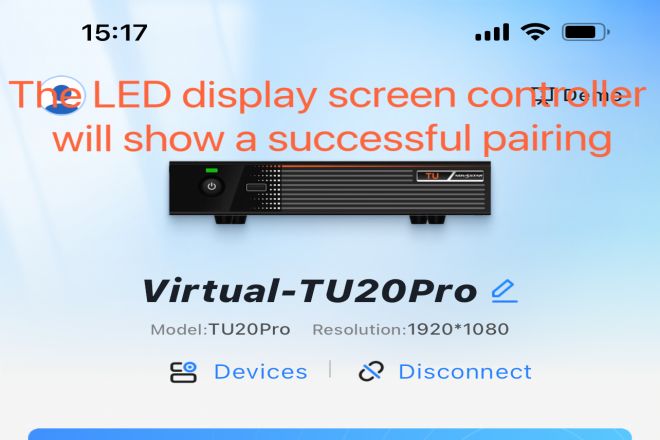
2). Device Search and Pairing
- Search for devices:
On the main interface of Viplex Handy, find and click “Device Search,” “Discover Devices,” or similar buttons. The software will start to automatically scan all recognizable devices currently connected to the same wireless network, including your LED display.
- Select device:
After scanning, the software will list all the devices that were found. Select your LED display device from the list. Please note that the device name, model, IP address, and other information may be displayed in the device list to help you identify it.
- Pairing:
After selecting the device, click the “Pair” or “Connect” button to start the pairing process. Depending on the settings of the LED display device, you may need to enter the device’s IP address or password (if the device has access control set up).
If the device does not have a password set, or you already know the password, just enter the corresponding information in the software.
If the device requires a specific pairing method (such as through QR code scanning, Bluetooth pairing, etc.), please follow the device manual or software prompts.
- Pairing success:
Once the pairing is successful, your LED display device will be displayed on the main interface of the Viplex Handy software, and a connection status icon (such as a green check mark, the word connected, etc.) will usually be displayed, indicating that the communication between the device and the software has been established.
Now, you have successfully paired the Viplex Handy software with the LED display device. Next, you can start using the functions provided by the software to edit and send content to the LED display.
3. Content Editing and Sending
After completing the software settings and device pairing, you can start editing and sending content to the LED display. Here are the detailed steps:
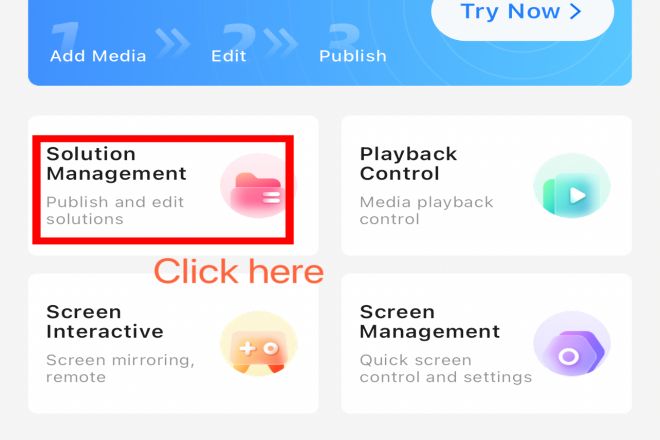
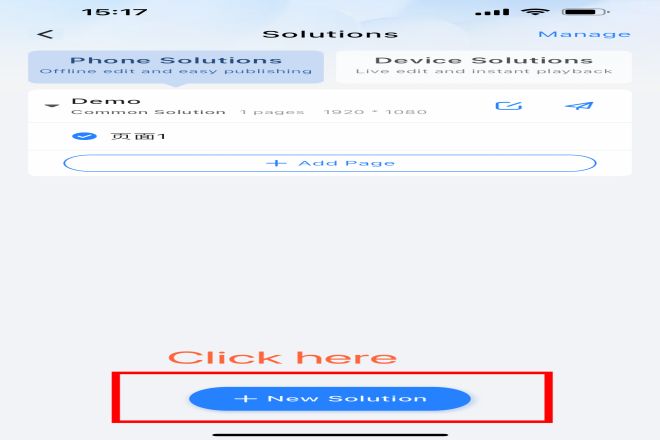
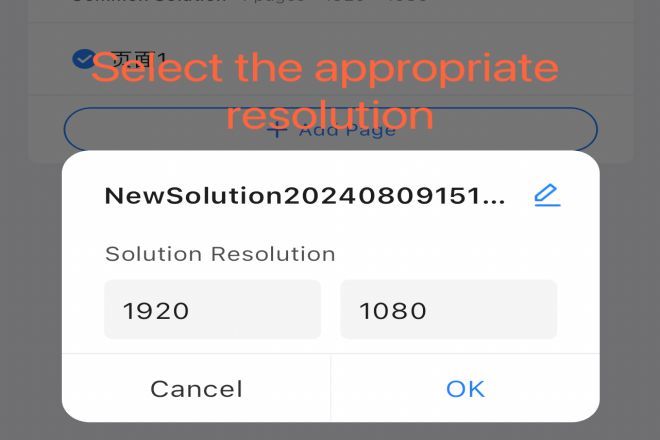
1). Content Editing
- Enter the editing interface:
On the main interface of Viplex Handy, find and click “Content Editing”, “New Content” or similar options. This will open a new editing interface for creating and editing content to be displayed on the LED display.
- Adding Content:
In the editing interface, you can choose to add multiple types of content, such as text, pictures, videos, etc. This is usually done by clicking the corresponding buttons or icons, such as “Add Text,” “Insert Picture,” etc.
For text content, you can use the editing tools provided by the software for typesetting, including font selection, font size adjustment, color setting, etc. Make sure that the text content is clear and easy to read and meets your display needs.
Pictures and video content can also be edited, such as cropping, scaling, adjusting the playback speed, etc. Make sure that the selected pictures and videos are of high quality and relevant to the theme.
- Preview and Adjustment:
After editing, use the preview function provided by the software to view the overall effect of the content. This helps you find potential problems and make adjustments, such as improper typesetting and inconsistent color matching.
By previewing, make sure that the content meets your requirements and is suitable for display on the LED display.
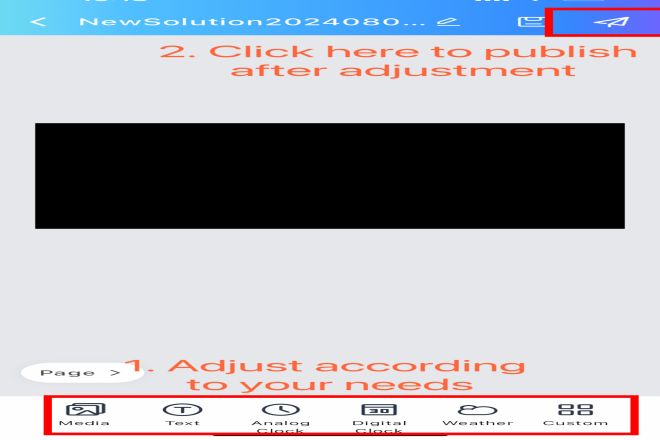
2). Send content to the LED display
- Send content:
After editing and previewing the content to your satisfaction, click “Send,” “Preview to Display,” or similar buttons. This will trigger the software to send the content to the previously paired LED display.
Depending on your network speed and the response time of the display, the content may be displayed on the LED display within a few seconds to a few minutes.
- 实时监控:
After sending the content, you can monitor the LED display in real-time on the Viplex Handy software interface. This helps you confirm whether the content has been successfully sent and displayed correctly.
If any problems are found (such as incomplete content display, misalignment, etc.), you can immediately adjust it in the software and resend the content.
- Manage playlists:
Viplex Handy software usually also supports the function of managing multiple playlists. You can create different playlists to organize different content combinations, and switch playlists as needed to control the display content of the LED display.
4. Advanced functions and settings
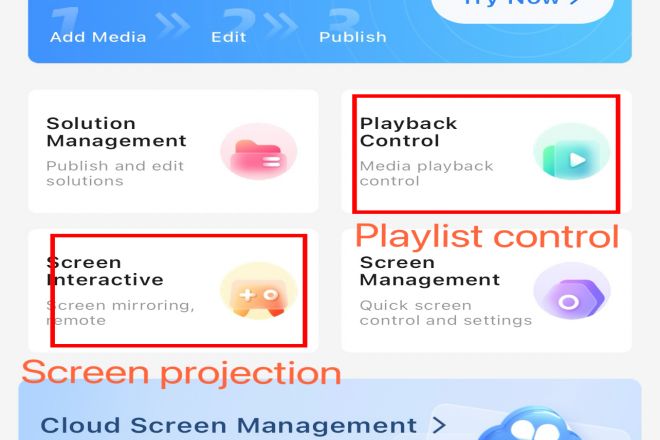
Viplex Handy not only provides basic content editing and sending functions but also includes a series of advanced functions and settings to meet the diverse needs of users in different scenarios. Here is a detailed introduction to these advanced features and settings:
1). Parameter adjustment
- 亮度 和对比:
In the settings menu of Viplex Handy, you can find options to adjust the brightness and contrast of the LED display.
According to changes in ambient light or personal preferences, appropriate adjustment of these parameters can make the display effect clearer and more comfortable.
- Playback speed:
For content containing animations or scrolling subtitles, Viplex Handy allows you to adjust the playback speed. Whether speeding up or slowing down, it can make the display of the content more in line with your needs.
- Other parameters:
In addition to brightness, contrast and playback speed, Viplex Handy may also support the adjustment of other parameters, such as color temperature, color saturation, etc.
The adjustment of these parameters can further enhance the display effect and make the content more vivid and realistic.
2). Scheduled playback
- Setting a scheduled task:
The scheduled playback function of Viplex Handy allows you to preset multiple time periods and corresponding playback content. When the specified time arrives, the LED display will automatically switch to the preset content for playback.
This function is very suitable for places that need to update information or play advertisements regularly, such as 购物广场, railway stations, etc.
Through scheduled playback, you can save a lot of manpower and material resources while ensuring the timeliness and accuracy of information.
3). Multi-screen management
- Control multiple displays simultaneously:
If your application scenario involves the control of multiple LED displays, Viplex Handy’s multi-screen management function will provide you with great convenience.
With this function, you can connect and control multiple displays at the same time to achieve synchronous playback or independent control of content.
In the multi-screen management interface, you can clearly see the status and connection of each display and manage them in groups. This helps you better organize and manage the playback content of multiple displays and improves work efficiency.
- Other advanced features
In addition to the functions mentioned above, Viplex Handy may also include other advanced features such as remote control, fault diagnosis, firmware upgrade, etc. The existence of these features makes Viplex Handy a powerful and easy-to-use LED display control software.
By continuously learning and mastering these advanced features, you will be able to give full play to the potential of Viplex Handy and bring more possibilities and innovations to your LED display display.
5. Precautions and FAQs
1). 注意事项
- Ensure a stable network connection:
When using Viplex Handy to control LED displays, the stability of the network connection is crucial.
Please ensure that your device (such as a mobile phone or tablet) is in the same stable network environment as the LED display to avoid content-sending failure or display abnormality caused by signal interruption.
- Comply with relevant laws and regulations:
When editing and sending content to the LED display, please be sure to comply with relevant national and local laws and regulations and do not spread any illegal or bad information.
This includes but is not limited to pornography, violence, reactionary content, etc. At the same time, you must also respect the intellectual property rights of others and not use unauthorized pictures, videos, and other materials without authorization.
- Update Viplex Handy software regularly:
In order to obtain the best performance and the latest features, it is recommended that users update Viplex Handy software regularly.
Software updates usually include performance optimization, feature enhancements, and security fixes, which help improve user experience and ensure data security.
2). FAQ
2.1). The device cannot be paired:
- 问题原因:
The device may not be on the same network, the IP address is entered incorrectly, the device password is incorrect, or the device itself has a fault.
- 解决方案:
First confirm that the device is connected to the same network and check whether the IP address and password are entered correctly. If the problem persists, you can try restarting the device or software and check whether the device is in a pairable state.
If the above methods are ineffective, there may be a malfunction of the device itself. Please contact the device manufacturer or technical support personnel for help.
2.2). Content sending failed:
- Cause:
It may be that the network connection is unstable, the content format is not supported, the device storage space is insufficient, or there is a bug in the software itself.
- 解决方案:
First, check whether the network connection is stable and try to resend the content. If the problem persists, check whether the content format meets the requirements of the LED display and clean up the device storage space to free up more space.
At the same time, you can also try to update the Viplex Handy software to the latest version for better compatibility and stability. If the above methods are ineffective, please contact technical support personnel for help.
2.3). Display screen display abnormality:
- Cause:
There may be a malfunction of the display itself, improper parameter settings, or content encoding problems.
- 解决方案:
First, check whether the display is working properly and adjust the parameter settings to improve the display effect. If the problem persists, check whether the content encoding is compatible with the display and try to re-edit and send the content.
If the above methods are ineffective, the display itself may malfunction. Please contact the device manufacturer or technical support personnel for help.
结论
Through the guidance of this article, I believe you have a comprehensive understanding of how to use Viplex Handy mobile software to control LED displays. From preparation to software settings to content editing and sending, each step is concise and clear, designed to help you get started quickly.
Viplex Handy not only simplifies the operation process of LED displays but also gives users more creative space, making every display a double feast of vision and information.
最后,如果您想了解更多关于LED显示屏的知识, 请与我们联系。
