مقدمة
Some people find some special conditions when installing شاشات عرض LED, such as the wall is too narrow, and the desired LED display screen size cannot be installed at all. What should I do?
In fact, don’t worry too much, just change your installation method. This article will discuss in detail what kind of LED display screen installation method can be chosen if the wall is too narrow?
جدول المحتويات
1. The impact of narrow walls on LED display screen installation
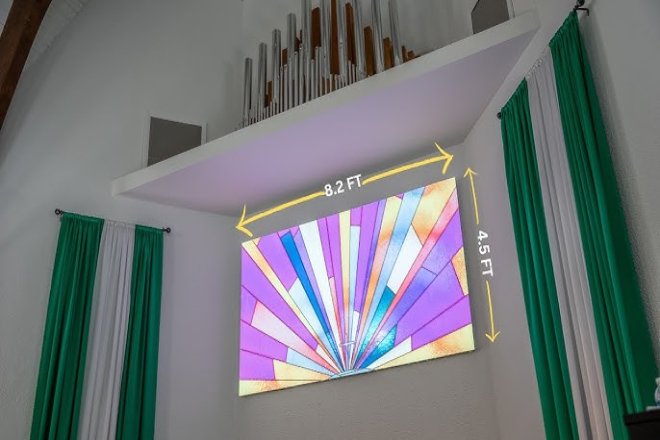
1). Installation space limitation
The width of the wall directly limits the size of the LED display screen you can choose.
Think about it: the wall is so wide, and a screen that is too large will not only look awkward but may also block the way, affecting walking or the use of other facilities. Therefore, you can only choose some suitable sizes, not too big or too small, just right.
Let’s talk about the shape. The wall is narrow, and those special-shaped and fancy-shaped display screens can’t be installed at all. It’s better to honestly choose rectangular or square ones, which are both practical and beautiful.
The installation method is also limited. I originally thought of using the front maintenance method to facilitate future repairs.
But the wall is too narrow, and there is no such large space. So, you may have to consider post-maintenance or other special installation methods. Although it is troublesome, there is no other way.
2). Visual effect consideration
The wall is narrow, and the viewing angle and visual effect of the LED display will also be affected. The wall is so wide, and the audience may not be able to see the content on the screen if they stand a little off.
Especially for large-scale events or meetings with many people, you should pay more attention to this problem.
So, in a limited space, you have to find a way to make the viewing experience the best. When choosing an LED display, you have to choose one with high سطوع, strong contrast, and bright colours so that it looks comfortable.
In addition, you have to calculate how far the audience is from the screen and what the angle is to ensure that everyone can see the content on the screen clearly.
3). Safety and stability requirements
If the wall is narrow, you have to be careful when installing the LED display. The installation structure must be stable, able to support the weight of the screen and be windproof and rainproof.
If it is not installed firmly, the screen may fall down when the wind blows, or it is slightly touched, which will be a big deal.
The installation method must also be selected correctly. Although the front maintenance method is convenient, the wall is too narrow, and it may not be installed.
Therefore, you may have to use rear maintenance or other special methods.
For example, you can add a bracket or a fixing frame behind the wall to fix the screen firmly on it. Although this is a bit troublesome to install, safety is the most important.
In general, a narrow wall has a significant impact on the installation of LED display screens.
You must be very careful when selecting and installing the screen, and you must consider the width of the wall, viewing requirements, the safety and stability of the installation structure, etc.
Only in this way can you ensure that the display screen is installed well, used for a long time, and everyone looks comfortable.
Method 1: Wall-mounted installation
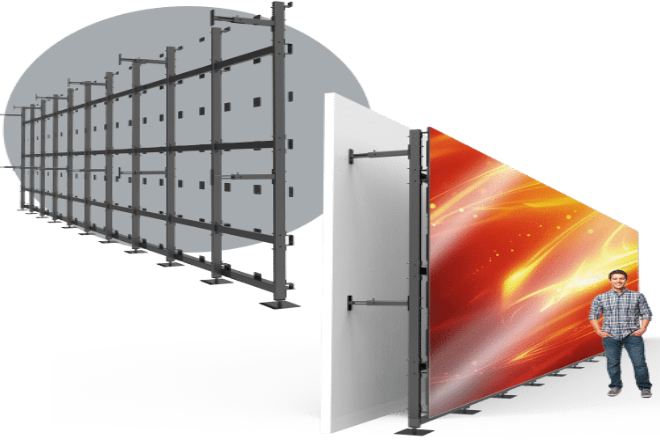
Wall-mounted installation is suitable for small indoor or semi-outdoor spaces, such as corridors, passage entrances, small meeting rooms or shop windows. This installation method is simply great.
These places have limited space, so it is obviously not possible to put a large shelf or hang something, but wall-mounted installation can easily solve the problem. It is like “sticking” the display screen to the wall, which is both space-saving and practical.
Wall-mounted installation is really unique when the wall is too narrow. First of all, it does not need any additional support frame or base and directly uses the wall to bear the weight, which saves a lot of space. This is a blessing for places where the space is already small.
Moreover, in order to adapt to the narrow wall, wall-mounted installation can also be a little tricky. For example, a folding frame can be designed, and a lot of space can be saved by folding it lightly during installation or maintenance.
In addition, it is also a good idea to choose an ultra-thin screen. This kind of screen is light and thin, easy to install and disassemble, and it takes up almost no space when hung on the wall.
In addition, wall-mounted installation is quite flexible. You can adjust the position and angle of the display screen according to the situation of the wall and your own needs to achieve the best viewing effect.
The wall-mounted installation has many advantages. First of all, it is very simple and quick to install, without the need for complicated construction and professional equipment, saving time and effort.
Moreover, it is also very convenient to maintain. If there is any problem with the display screen, or if you want to replace it with a new one, you can just dismantle and install it without making a big fuss.
However, the wall-mounted installation also has its minor disadvantages. For example, it has to rely on the wall to bear the weight, so the wall must be strong enough.
If the wall’s load-bearing capacity is not good, the display screen may have to find another place; otherwise, there may be safety hazards.
In addition, when repairing, the entire display screen may have to be removed, which is a bit troublesome. Especially for those large or fixed wall-mounted displays, it may take some effort to dismantle and install them.
But in general, wall-mounted installation is still very useful, especially when the wall is too narrow.
As long as you choose the right installation method and location and pay attention to the wall’s load-bearing capacity, you can hang the display screen steadily on the wall, which is both beautiful and practical.
Method 2: Embedded installation
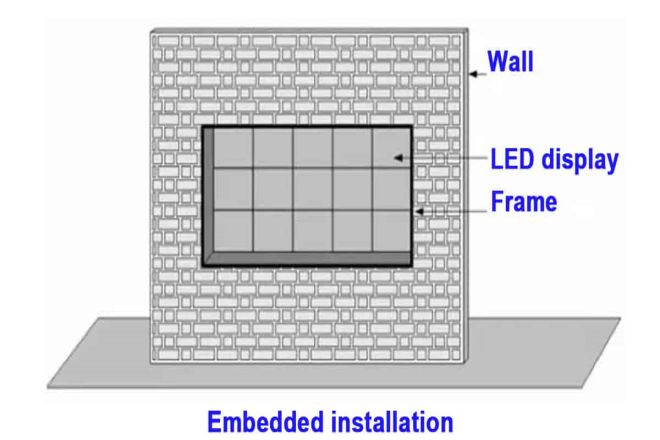
Embedded installation is a very clever choice when the wall is too narrow.
Especially in indoor environments, such as the entrance of a building and the lobby of a building, embedded installation can make the display screen and the wall perfectly integrated, looking very neat and high-end.
Imagine walking into a building, there is a display screen embedded on the wall at the entrance, playing a welcome message or advertisement, does it feel very classy?
The embedded installation characteristic is to make a hole in the wall and then install the display screen so that the surface of the display screen is flush with the wall.
In this way, the display screen is like a part of the wall, which is very beautiful. However, when the wall is too narrow, the size of the hole must be particularly particular, not too large or too small, but just right.
In order to adapt to the narrow wall, we can optimize the size of the hole and try to match the size of the hole with the size of the display screen.
At the same time, a simple box design can also be used to make the installation of the display screen more convenient. This box design is not only light but also easy to install and disassemble. It is really a good solution for narrow walls.
However, embedded installation also has a difficulty; that is, it is necessary to make a hole in the wall, which requires carefulness.
When making a hole, you must ensure that the structure of the wall is safe and cannot destroy the load-bearing capacity of the wall. Therefore, before installation, you must find a professional to evaluate and plan.
Embedded installation has obvious advantages. First of all, it is beautiful and generous. The display screen and the wall are integrated, which looks very comfortable.
Secondly, it saves space and does not require additional space. For places with limited space, this is really a big advantage.
However, embedded installation also has its disadvantages. First of all, the installation is complicated. It is necessary to make a hole in the wall and then install the display screen and the box. The whole process is quite cumbersome. Secondly, it is not conducive to heat dissipation.
Because the display screen is embedded in the wall, the heat dissipation conditions may not be very good, and special attention must be paid.
Finally, it is difficult to repair. If there is any problem with the display screen, it may be troublesome to repair it. The display screen must be removed from the wall.
So, although embedded installation is beautiful and generous and saves space, the disadvantages of complex installation, poor heat dissipation, and difficult maintenance must also be taken into account.
When choosing an installation method, you must decide based on your needs and actual situation.
If the wall is too narrow, but you want the display to look beautiful and generous, then embedded installation may be a good choice. However, you must find a professional to install and repair it to ensure safety and effectiveness.
Method 3: Cantilever or swivel bracket mounting
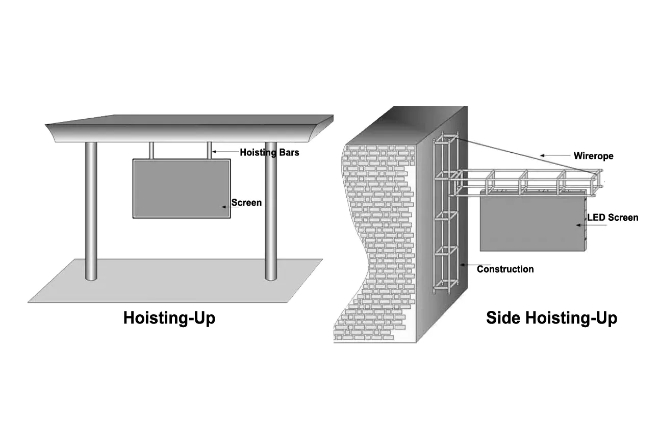
Cantilever or swivel bracket mounting is really a lifesaver when the wall is too narrow!
Think about it: some places have pitifully narrow walls, but if you want to install a large screen, then the cantilever or swivel bracket comes in handy.
For example, in the exhibition hall, you want the screen to follow the audience and be able to see it wherever they go, or in the conference room, adjust the angle according to where everyone sits so that everyone can see it clearly.
Also, if the screen is broken or needs to be upgraded, this installation method allows you to easily remove it for repair or replacement without making a big fuss.
Speaking of installation features, cantilever or swivel bracket mounting is really flexible.
Instead of using the wall to support the screen directly, it uses a cantilever or bracket to “extend” the screen a little so that it doesn’t matter how narrow the wall is.
Moreover, this bracket can also allow the screen to rotate around, so you can watch it however you want.
In order to adapt to the narrow wall, we can use our brains to optimize the design of the cantilever or bracket. For example, make it more compact and lighter, and don’t take up too much space.
You can also use some lightweight materials, such as aluminium alloy, which is both strong and light. This way, it is both stable and beautiful to install.
Be careful when installing. Make sure the cantilever or bracket is firmly fixed to the wall, and don’t shake when touched. You also have to calculate how heavy the screen is and whether the bracket can support it.
Especially when installed outdoors, you have to consider whether the wind is strong and whether it can be blown away.
Cantilever or rotating bracket hanging has many advantages. The best thing is flexibility; you can adjust it as you want to meet everyone’s various needs.
It is also convenient for maintenance. If the screen is broken or needs to be upgraded, it can be easily disassembled.
However, this installation method also has several minor disadvantages. First, it is quite troublesome to install, and you need to find a professional to do it, not by yourself. Secondly, the cost is a bit high.
After all, the cantilever or bracket must be customized, and good materials must be used. Finally, if it is installed outdoors, it may shake a little when the wind is strong, and it needs to be reinforced.
In general, a cantilever or rotating bracket hanging is really a good choice, especially when the wall is narrow, or the angle needs to be adjusted flexibly. Just be careful when installing, and don’t forget to calculate the cost and wind problem.
After choosing the installation method, the large screen can be hung there steadily, which is both beautiful and practical!
Method 4: Floor-standing installation
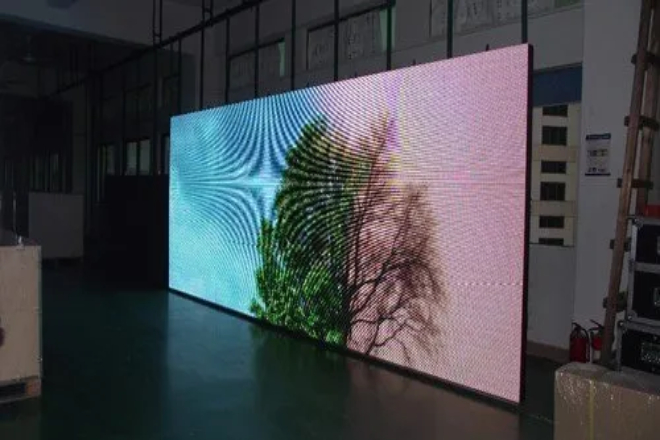
Floor-standing installation, especially the movable installation with rollers, is a blessing when the wall is too narrow!
Think about it, in some occasions, such as exhibition halls and conference rooms, the layout needs to be changed frequently, or the position of the display needs to be adjusted according to the needs of the event.
At this time, the narrow wall becomes a big problem, and hanging on the wall is obviously not possible. But floor-standing installation solves this problem perfectly. You can put it wherever you want; very flexible!
The characteristic of floor-standing installation is that the ground is used to support the display without relying on the wall. Moreover, many of these installation methods have rollers, which can be moved with a light push, which is very convenient.
When the wall is too narrow, the advantages of this installation method are more obvious.
You can push the display to the most suitable position according to actual needs.
In addition, in order to ensure the stability of the display, we can also optimize the support structure, such as using a more stable base or adding some support rods.
In terms of materials, you also have to choose the one that is both light and strong, so that the display can be stable and easy to move.
In addition, considering that the ground may not be flat, we can also add some adjustable foot pads under the base.
In this way, whether the ground is slightly sloped or a little bumpy, the display can stand steadily.
There are really many advantages of floor-standing installation. First of all, it is highly flexible.
You can move it however you want and put it wherever you want. This is a magic weapon for occasions where the layout needs to be changed frequently!
Moreover, it is particularly easy to move. For example, if you have an event that will use the display screen in the next few days, and you need to move it to another place after the event, the floor-standing installation with rollers can make it easy for you to do it.
However, this installation method also has its disadvantages. The first is that it takes up ground space.
After all, the display screen is placed on the ground, so it will definitely take up some space. If the space is limited, you may have to consider it.
In addition, the flatness of the ground may also affect the stability of the display screen. If the ground is too uneven, the display screen may wobble, affecting the viewing effect.
Therefore, before installation, you must first check the flatness of the ground and add some foot pads to level it if necessary.
In general, floor-standing installation is a good choice when the wall is too narrow. It is flexible and easy to move, but you have to pay attention to the ground space and flatness.
After choosing the installation method, pay attention to these details, and your display will stand there steadily, adding a lot of brilliance to your event!
2. Exploration of other innovative installation method
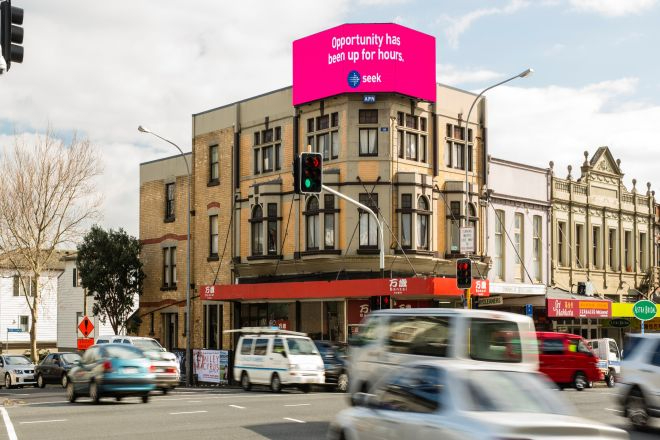
1). Rooftop installation method
1.1). Application scenario:
Rooftop installation is simply the “sky dance” of outdoor billboards! Imagine a huge display standing on the roof of a busy city street, attracting the attention of passers-by.
When the wall is too narrow to fit this “giant”, the roof becomes its new home. This method is especially suitable for advertisers who want to make a big splash in the city centre but are constrained by limited wall space.
1.2). Installation features:
Rooftop installation requires some “high-altitude work” skills. The installation masters have to be busy on the roof, like Spider-Man, to fix the display screen firmly.
In order to ensure that this big guy does not “shake his head” in the air, some super-stable support structures, such as steel structure frames, must be used. In this way, even if it is windy and rainy, the display screen can stand.
1.3). Advantages and disadvantages analysis:
The first advantage is that the space utilization rate is extremely high. There is such a large area on the roof, so it is useless if it is not used!
Moreover, the visual effect of the display screen in the sky is not covered; the coverage is wide, and the publicity effect is great.
However, there are also disadvantages. The cost of high-altitude work is not low, and it costs a lot of money to install and maintain.
Moreover, if there is any disturbance, it will be troublesome to maintain it, and you have to go to the roof carefully. In addition, high-altitude work is a bit dangerous after all, so you must take all safety measures.
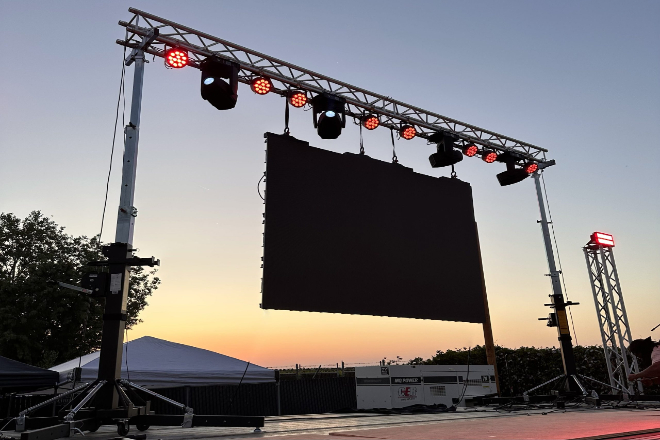
2). Rental hoisting method
2.1) سيناريوهات التطبيق:
Rental hoisting is a “savior” for temporary activities or exhibitions! Imagine that you are preparing for a large outdoor event and need a large screen to display the content, but the wall on site is too narrow. What should you do?
At this time, rental hoisting comes in handy. Once the crane is lifted, the screen is suspended steadily in the air, and the problem is solved!
2.2). Installation features:
Rental hoisting is very flexible. You can put it wherever you want, and the height and angle can be adjusted as you like.
Moreover, installation and disassembly are super fast, saving time and effort. Whether it is a square, park or a temporary booth, it can be easily handled.
2.3). Advantages and disadvantages analysis:
The advantages are, first of all, flexibility and convenience.
You can rent it when you need it and return it when you are done. It is convenient and affordable. Moreover, the hoisting method can adapt to various complex terrains and narrow spaces, and it is very practical.
However, there are also disadvantages. The cost of long-term rental of hoisting equipment is not low. Moreover, you must be careful during the hoisting process.
If there is any mistake, it will be troublesome. In addition, weather is also an uncertain factor. Bad weather may affect the safety and efficiency of the hoisting operation.
3). Other innovative installation methods
3.1). Arc installation:
Curved installation is simply the perfect combination of art and technology! Imagine a huge display screen supported by a curved structure, presenting a streamlined beauty.
This method is particularly suitable for places that want to create unique visual effects, such as exhibition halls, art exhibition halls, etc.
To install a curved display screen, you need to have some “ingenuity”. The curvature and size must be accurately calculated to ensure that the display screen fits perfectly with the curved structure.
In this way, not only the visual effect is great, but also the beauty of the space can be enhanced!
However, the curved installation also has its disadvantages. First of all, it is difficult to install and requires professional technology and experience. Moreover, the cost is not low, including the production and installation costs of the curved structure.
3.2). Truss mobile installation:
Truss mobile installation is simply the “porter” of the display screen! Imagine that a large screen is supported by a truss structure and can be easily moved between different venues.
This method is particularly suitable for occasions where the display screen needs to be moved frequently, such as touring exhibitions, outdoor performances, etc.
The advantage of truss mobile installation is that it is extremely flexible. You can move it wherever you want, which is convenient and fast.
Moreover, strong adaptability is also a major advantage. Whether it is flat ground or rugged terrain, it can be easily handled. However, truss mobile installation also has its disadvantages.
The first is the high cost, including the production of the truss structure, the cost of the mobile device and the installation.
Moreover, the installation and disassembly process is relatively complicated and requires professional personnel to operate. However, for the flexibility and convenience, this effort is worth it!
3. Preparation and precautions before installation:
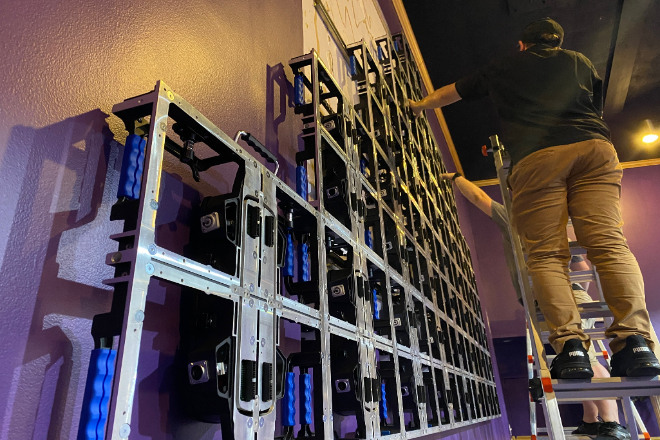
1). Site survey and measurement
Before installing the display screen, on-site survey and measurement are crucial steps.
This not only ensures the smooth progress of the installation process but also effectively avoids various problems that may arise later.
Through survey and measurement, we can accurately understand the environmental conditions, space dimensions and possible limiting factors of the installation site, and provide detailed data support for the installation work.
1.1). Specific content and methods of survey and measurement:
- Environmental condition survey:
Check the light, temperature, humidity and other environmental factors at the installation site to ensure that they meet the normal working requirements of the display.
- Space dimension measurement:
Use measuring tools to accurately measure the length, width, height and other dimensions of the installation location to ensure that the display can be perfectly embedded without affecting the surrounding environment and traffic.
- Limitation factor assessment:
Identify and evaluate the limiting factors that may affect the installation process, such as the location of power sockets, network line layout, wall material, etc., to make full preparations for subsequent installation work.
1.2). Method:
Usually, tools such as tape measures and laser rangefinders are used for precise measurement, and detailed information is recorded by combining on-site photography, drawing and other methods to provide a reliable basis for the installation plan.
2). Select appropriate installation materials and tools
2.1). Selection principles:
- Select according to the installation method:
Different installation methods have different requirements for materials and tools.
For example, wall-mounted installation requires sturdy brackets and expansion screws, while floor-standing installation may require a stable base and rollers.
- Select according to environmental requirements:
Consider the environmental conditions of the installation site and select corrosion-resistant, high-temperature-resistant or waterproof materials and tools to ensure the long-term stable operation of the display.
2.2). Commonly used installation materials and tools:
- Installation materials:
Brackets, screws, expansion bolts, bases, protective covers, etc. When selecting, ensure that the quality of the materials is reliable and meets safety standards.
- Installation tools:
Electric drills, wrenches, screwdrivers, levels, measuring tools, etc. These tools are essential in the installation process. Make sure they are in good condition and easy to operate.
3). Make a detailed installation plan
Making a detailed installation plan is the key to ensuring that the installation work is carried out in an orderly manner.
Through the plan, we can clarify the installation steps, time arrangements and personnel division of labor, improve work efficiency, and reduce unnecessary delays and errors.
3.1). Specific contents of the installation plan:
- Installation steps:
List each step of the installation process in detail, including preparation, actual installation, debugging and testing, etc., to ensure that each step is clear.
- Time arrangement:
According to the complexity of the installation steps and the time required, arrange the schedule reasonably to ensure that the installation work can be completed on time.
- Division of labour:
Clarify the responsibilities and tasks of each person involved in the installation to ensure that everyone performs their duties, works together, and improves work efficiency.
4). Safety regulations and protective measures
During the installation process, it is crucial to comply with safety regulations.
Display installation often involves dangerous operations such as high-altitude operations and electrical wiring, which may cause safety accidents if not careful.
Therefore, we must always keep in mind the principle of safety first and take effective protective measures.
4.1). Common safety protection measures:
- Wear a safety helmet:
When working at high altitudes or in areas where objects may fall, you must wear a safety helmet to protect your head from injury.
- Use a safety belt:
When working at high altitude, you should use a safety belt to firmly fix yourself to a reliable support point to prevent falling.
- السلامة الكهربائية:
When wiring or operating electrical equipment, make sure the power is turned off and use insulating tools to avoid electric shock accidents.
- On-site warning:
Set up warning signs and fences at the installation site to remind passers-by to pay attention to safety and avoid accidental collisions or interference with installation work.
In short, the preparations and precautions before installation are important guarantees to ensure the successful installation of the display.
We must take every link seriously and be meticulous to ensure the smooth progress of the installation process and the long-term stable operation of the display.
This article discusses the various installation methods for LED display screens when the wall is too narrow, including wall-mounted, embedded, cantilevered, floor-standing, etc., and briefly mentions innovative installation methods.
In practical applications, it is necessary to comprehensively consider the wall conditions, usage requirements and budget, and make flexible choices.
4. Conclusion
Looking forward to the future, LED display installation technology will be more intelligent and lightweight, encourage industry innovation, and meet market demand.
At the same time, the installation process must strictly comply with safety regulations.
وأخيرًا، إذا كنت تريد معرفة المزيد عن شاشات العرض LED، يرجى الحصول على اتصال معنا.
