مقدمة
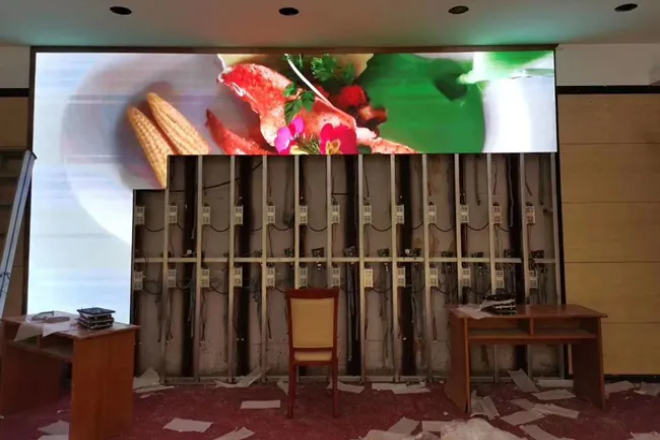
Nowadays, more and more people want to assemble شاشات عرض LED by themselves, which can save money and be customized on demand. But do you think it is as simple as “buy a few modules and assemble them”?
In fact, if you want to assemble a set of LED screens that can run normally and display well, it is not just as simple as wiring. What skills do you need to master to “assemble” LED modules to achieve professional effects? Let’s take a look.
جدول المحتويات
Skill 1: The basic cognitive ability of LED modules
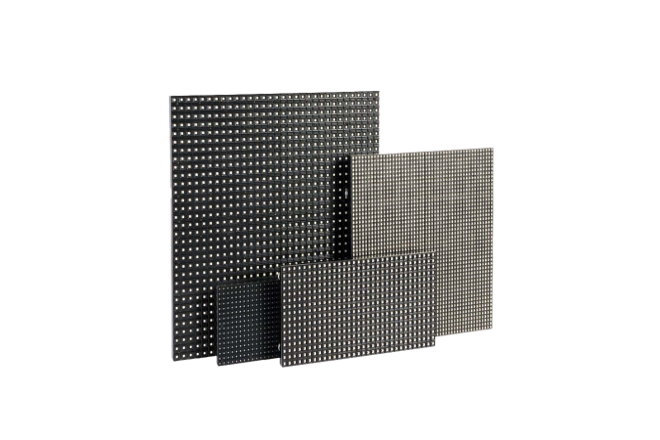
وحدات LED, in simple terms, are small modules that combine many small lamp beads (LEDs) together, and they can be used in many places.
Just like the lights we usually see, whether it is the lights at home, the street lights outside, or the advertising light signs in the store, many of them use LED modules.
Let’s talk about its key features first.
First of all, the color. Some modules can only emit a fixed color of light, such as pure white light or pure red light; some can emit rainbow colors, but the whole string of lights can only be one color.
The most powerful is the full-color single-point control, each small lamp bead can change color individually, so that various patterns and videos can be spelled out, such as those large outdoor display screens, which are made of this module.
Then there is the voltage, which is very important because if the voltage is not right, the small lamp beads may be burned out.
The common voltage is 12 volts, which is safer and less likely to cause problems when used.
There is also سطوع, which is easy to understand, that is, how bright the light is. If it is used in a darker place or requires very bright lighting, you have to choose a module with high brightness.
If it is used in a place that does not require too much light, you can choose a lower brightness, which can also save electricity.
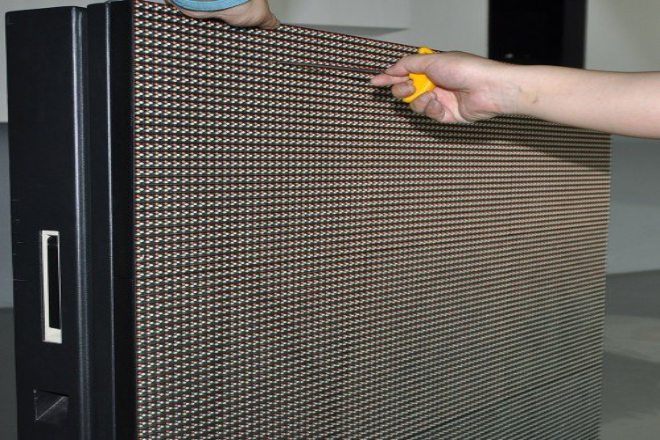
Waterproofing is also critical, especially for those lights placed outside. For example, on rainy days or in places with water, if the module is not waterproof, it is easy to break. Therefore, if it is used outdoors, you have to choose a module with a high waterproof rating.
When it comes to application scenarios, LED modules are really versatile. You can use it as a normal lighting lamp or a decorative lamp to add some atmosphere to your home. In stores, you can use it as an advertising light to attract customers’ attention.
On the street, it can be used as a street lamp to illuminate the road. On the stage, it can be used as a stage light to create all kinds of cool effects.
In short, whether it is indoors or outdoors, whether you need a bright light or colored light, you can find a suitable LED module to use.
Skill 2: For electronic circuit design and debugging capabilities
1). Drive circuit design
1.1). Constant current drive principle:
LED lamp beads are very delicate. If the current is unstable, it will cause different brightness and even break faster.
So, using the constant current drive is like providing a stable “meal amount” for LED lamp beads so that they can all eat well, the brightness will be uniform, and the life span will be longer.
1.2). PCB wiring optimization:
When designing a circuit board, make the current transmission path as short as possible, just like planning the shortest path for the current to run quickly so that the voltage drop can be reduced.
Especially for those large LED modules, the surrounding lamp beads are easy to dim due to the long distance of current transmission. By optimizing the wiring, each lamp bead can be made equally bright.
2). Power supply adaptation and connection
2.1). DC power supply specification:
If you use a 5V module, you must use the red wire to connect the positive pole and the black wire to the negative pole.
This is a conventional rule for everyone to distinguish. And the voltage should be controlled between 4.8V and 5.5V, not too high or too low, otherwise the module will burn out or the brightness will not be enough.
2.2). Power load matching:
The power of the power supply and the LED module should be matched well, just like the relationship between the carriage and the horse. If the carriage is too heavy, the horse will be tired.
Generally speaking, the power of the switching power supply should be about 1.25 times the power of the LED load so that the power supply will not always work at full load and can be used longer.
3). Signal transmission and control
3.1). Signal transmission protocol:
To make the LED module display the way we want, we have to use signal transmission protocols, such as SPI and PWM.
These protocols are like the language for sending instructions to LED modules so that they can display synchronously, such as lighting up or changing colors at the same time.
3.2). Use of debugging tools:
When debugging circuits, oscilloscopes and multimeters are essential tools. Oscilloscopes can see the waveform of the signal, just like “taking an X-ray” of the signal to see if there is any problem.
Multimeters can measure voltage and current to check whether the circuit is working properly. If you are proficient in using these tools, you can quickly find the problem and adjust the circuit to the best state.
In short, electronic circuit design and debugging is like building a comfortable and stable nest for LED modules so that they can work well and show the effect we want.
Skill 3: Structural design and installation skills for LED display screens
When installing the modules of LED display screens, you have to pay attention to two things.
First, the fixation must be firm. If the box is installed with screws, all screw holes must be tightened; if it is installed with magnetic columns, at least 6 magnets must be used to ensure that the module will not loosen.
Second, the spacing and thickness between modules should be appropriate. Generally, the spacing is 3 to 6 cm, and the thickness is between 5 and 15 cm.
This ensures that the brightness of the screen is uniform when it is displayed, and there will be no situation where one end is bright, and the other end is dark.
LED display screens will generate heat when working, and high temperature will affect the life and brightness.
Therefore, heat dissipation must be done well, either by designing a heat dissipation channel or installing a fan.
If the display screen is placed in a confined space, such as a cabinet, an air conditioner or exhaust fan must be installed, otherwise the heat will accumulate inside and the screen will easily have problems.
ل شاشة LED خارجية screens, waterproofing is very important. The surface of the module should be coated with waterproof glue, and waterproof joints should be used at the joints to prevent rainwater from seeping in.
In addition, you must pay attention to anti-static during installation, and wear anti-static bracelets or gloves. Because static electricity may burn the LED chip, like a small lightning, so anti-static measures are indispensable.
Skill 4: Fault diagnosis and maintenance capabilities for LED display screens
1). Troubleshooting steps:
When there is a problem with the LED display, you can follow the steps below to diagnose:
1.1). Observation
First, take a close look at the screen to see if there are any color blocks or uneven brightness. For example, some areas are particularly bright, or some lamp beads are completely off.
These phenomena may be caused by damaged lamp beads or loose connection wires. At the same time, check if there is any obvious damage on the surface of the screen, such as scratches or impact marks, which may affect the display effect.
1.2). Listening
Listen to the sound of the display when it is working. Under normal circumstances, the sound of the fan should be stable.
If you hear abnormal noises, such as humming or clicking, it may be a fan failure or loose parts inside. Discovering these abnormal sounds in time can prevent the problem from getting worse.
1.3). Asking
Talk to the user to understand their recent operations. For example, have you accidentally touched the screen or adjust the screen settings?
Sometimes, misoperation may cause display abnormalities, such as sudden dimming of brightness or incorrect display mode.
Knowing this background information can help quickly locate the problem.
1.4). Detection
Use tools to detect the voltage and current. You can use a multimeter to measure whether the voltage of the power supply is within the normal range. For example, for a 5V module, the voltage should be between 4.8V and 5.5V.
At the same time, check whether the current is too large. Excessive current may burn out the lamp beads.
If the voltage or current is abnormal, it may be a power supply problem or a short circuit in the connecting wire.
2). Common fault handling
2.1). Lamp bead damage
If it is found that individual lamp beads are not lit or the color is abnormal, you can use a hot air gun to remove the broken lamp bead and replace it with a new one.
During operation, pay attention to the fact that the welding temperature should be controlled at around 245℃, with a fluctuation of no more than 5℃, and the welding time should not exceed 3 seconds.
Excessive temperature or long time will damage the new lamp bead. After replacing the lamp bead, carefully check whether the welding point is firm to ensure that the lamp bead can work normally.
2.2). Control system failure
If the screen display is chaotic or not displayed at all, there may be a problem with the control system.
First, check whether the driver IC layout is loose and whether the signal line connection is normal. Sometimes, a loose signal line or poor contact can cause abnormal display. If these are all OK, you can try resetting the control card.
Just like restarting a computer, unplug the power cord, wait a few minutes, and then plug it in to see if the screen returns to normal.
If it still doesn’t work after resetting, you may need to replace the control card or contact a professional maintenance person.
3). Preventive maintenance
In order to reduce failures, you should do more preventive maintenance at ordinary times:
3.1). Cleaning
Regularly clean the surface of the module with a clean soft cloth to prevent dust accumulation. Dust will not only affect the display effect, but also affect the heat dissipation, causing the screen to overheat.
Be gentle when cleaning to avoid damaging the lamp beads with excessive force. It is generally recommended to clean once a week, especially in dusty environments.
3.2). Check the connection cable
Regularly check whether the connection cable is loose or damaged. You can gently shake the connection cable to see if there is any looseness.
If you find a damaged connection cable, replace it in time to avoid interruption or instability in signal transmission.
At the same time, check whether the power cord is aging. Aging power cords may cause voltage instability and affect the service life of the screen.
3.3). Adjust brightness and contrast
According to the use environment, adjust the brightness and contrast of the screen appropriately.
In a dark environment, you can appropriately lower the brightness, which can save electricity and reduce eye fatigue. In a strong light environment, increase the brightness appropriately to ensure clear display.
At the same time, adjust the contrast regularly to make the picture look more comfortable. Generally speaking, it is recommended to adjust the brightness and contrast every two weeks and make fine adjustments according to actual usage.
Skill 5: Debugging ability for LED display screens
Debugging LED display screens is actually like “tuning” the screen so that it can work properly and the display effect is good.
First, you have to connect the computer and the display screen and install the control software, such as NovaStudio.
Then, adjust the resolution of the computer to match it with the display screen so that the screen can display normally.
Next, open the settings interface, enter the password (each person’s password may be different), and adjust the resolution and display mode so that the pixels of the screen can be correctly identified.
After identification, adjust the refresh rate and grayscale parameters as needed to make the picture look smoother and more delicate, and finally save the settings.
If you want to debug the LED screen, enter the setting interface, set the display screen connection, and fill in the number, type, horizontal and vertical card numbers and other parameters of the display screen.
Adjust the brightness, contrast, and color according to actual needs to ensure that the screen has a good display effect in different environments.
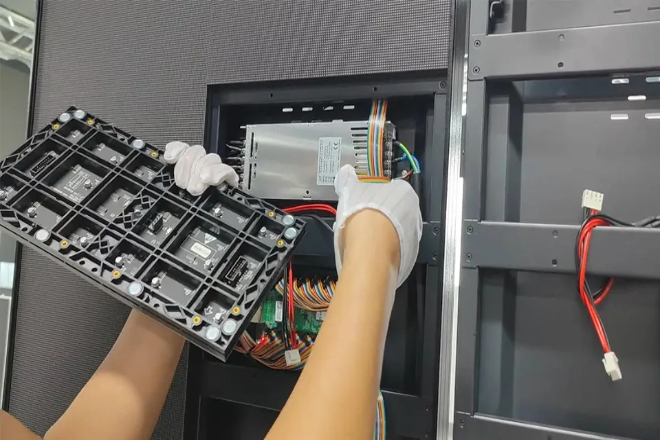
During debugging, you should also pay attention to the hardware inspection to ensure that the display module, power supply, and control system are well-connected and not loose or damaged.
According to the installation location and عرض المسافة, adjust the سطوع and color temperature to make the screen look comfortable. If the color of the picture is not right, you can adjust the color saturation and hue to make the color more natural.
إذا دقة of the display content is different from the screen, you need to scale the image to maintain the image ratio and avoid deformation.
Finally, the playback mode can be set as needed, such as automatic playback, manual playback, or timed playback.
In short, debugging the LED display is connecting the device, adjusting the parameters, checking the hardware, adapting to the environment, adjusting the color, and setting the playback.
Step by step, the screen can work normally, and the display effect can be achieved.
6. Conclusion
Assembling LED display screens seems to be something that can be done with strong hands-on ability, but in fact, it involves a wide range of knowledge: from module selection, circuit design, to structural installation, troubleshooting, debugging and optimization, every link has hidden tricks.
If you just want to “assemble it yourself to save some money”, it is better to learn these skills first.
أخيرًا، إذا كنت تريد معرفة المزيد عن شاشات LED، يرجى الحصول على اتصال معنا.