مقدمة

عندما تجد أن الصورة على جهازك عرض الصمام إذا لم يعد الأمر واضحًا، فقد تشعر بالإحباط لأنه يؤثر بشكل مباشر على تأثير الاتصال للمعلومة.
بصفتك مالكًا لشاشة LED، قد ترغب في معرفة كيفية حل هذه المشكلة بسرعة وفعالية. ستقدم لك هذه المقالة بعض النصائح العملية لمساعدتك على حل هذه المشكلة بنفسك واستعادة وضوح شاشة LED الخاصة بك.
الطريقة 1: التحقق من توصيل خط الطاقة والإشارة لشاشة LED
الخطوة 1: الحصول على استقرار مصدر الطاقة
أولاً، علينا التأكد من أن مصدر الطاقة لشاشة LED مستقر، تمامًا كما تحتاج الأضواء في المنزل إلى تيار مستقر للإضاءة.
- هل تم توصيل القابس بإحكام؟
أولاً، تأكد من تثبيت قابس الطاقة بإحكام في المقبس. في بعض الأحيان، قد لا يكون القابس محكمًا، أو قد يكون المقبس مرتخيًا بعض الشيء، مما يؤثر على استقرار مصدر الطاقة.
- هل الجهد صحيح؟
بعد ذلك، نستخدم جهازًا صغيرًا يُسمى الفولتميتر لقياس جهد سلك الطاقة. شاشة LED لها نطاق جهد يناسبها، ويجب التأكد من أن الجهد يقع ضمن هذا النطاق. وإلا، فقد تظهر الشاشة سوداء أو غير واضحة أو تومض.
- هل سلك الطاقة تالف؟
افحص سلك الطاقة جيدًا للتأكد من عدم وجود أي أجزاء مكسورة أو تلف غلاف السلك وظهور السلك الداخلي. في حال وجود أي تلف، يجب استبداله بآخر جديد فورًا، وإلا فقد يقع حادث كهربائي. هذا مهم جدًا!
الخطوة 2: إصلاح اتصال كابل الإشارة
كابل الإشارة بمثابة "جسر" بين شاشة LED والكمبيوتر أو أي جهاز آخر. في حال وجود مشكلة في هذا "الجسر"، قد لا تكون الصورة على الشاشة واضحة أو مستقرة.
- هل كابل الإشارة مكسور؟
أولاً، افحص كابل الإشارة بحثاً عن أي أجزاء مكسورة أو أطراف سلكية مفكوكة. في حال وجود أي كسر أو فك، قد لا تنتقل الصورة.
- هل تم توصيل القابس؟
بعد ذلك، يجب عليك التأكد من تثبيت قابس كابل الإشارة بإحكام في شاشة LED ومصدر الإشارة (مثل جهاز كمبيوتر). في بعض الأحيان، قد لا يكون القابس مُحكمًا أو مُدخلًا بشكل عكسي، مما يؤثر على نقل الإشارة.
- حاول عرض الصورة.
الآن، يمكنك تشغيل مصدر الإشارة (مثل جهاز كمبيوتر) والتحقق من وضوح الصورة وثباتها على شاشة LED. في حال وجود مشكلة في الصورة، فقد تكون المشكلة في كابل نقل الإشارة.
- حاول تغيير الكابل.
إذا كنت تشك في أن المشكلة في كابل الإشارة، يمكنك تجربة استبدال كابل إشارة جديد والتأكد من سلامة الصورة. إذا كانت الصورة سليمة بعد استبدال الكابل، فقد يكون هناك مشكلة في كابل الإشارة الأصلي.
باتباع هذه الخطوات البسيطة، يمكنك بسهولة فحص كابلات الطاقة والإشارة لشاشة LED. إذا لم تُحل المشكلة، فقد تحتاج إلى الاستعانة بفني متخصص.
الطريقة 2: ضبط سطوع وتباين شاشة LED

أحيانًا، لا تظهر الصورة على شاشة LED بوضوح كافٍ، أو أن اللون غير ساطع بما يكفي. في هذه الحالة، نحتاج إلى ضبط السطوع والتباين. لا تقلق، الأمر سهل. اتبع الخطوات التالية، ويمكنك إصلاح المشكلة بسهولة!
الخطوة 1: ضبط السطوع لجعل الشاشة أكثر راحة
السطوع أشبه بـ"ضوء" لشاشة LED. السطوع الزائد يُبهر، والظلام الزائد يُفقد الصورة وضوحها. لذا، يجب اختيار السطوع المناسب.
- ابحث عن المكان لضبط السطوع:
انظر أولاً إلى الشاشة أو جهاز التحكم عن بُعد لترى إن كان هناك رمز شمس أو سطوع صغير. انقر عليه إن وجدته، أو اضغط على الزر المقابل.
- ضبط سطوع باليد:
استخدم أزرار جهاز التحكم عن بُعد أو الشاشة لزيادة أو خفض السطوع تدريجيًا. يمكنك مشاهدة تغير الصورة على الشاشة والعثور على سطوع تعتقد أنه واضح ولكنه غير ساطع.
(إذا لم يكن هناك مثل هذا الزر على الشاشة، فيجب عليك ضبطه على برنامج التحكم. يرجى الرجوع إلى هذه المقالة للحصول على التفاصيل)
الخطوة 2: اضبط التباين لجعل الصورة أكثر طبقات
التباين هو مثل إضافة "مرشح" إلى الصورة، مما يجعل المناطق الساطعة أكثر سطوعًا والمناطق الداكنة أغمق بحيث تبدو الصورة ثلاثية الأبعاد بشكل أكبر.
- ابحث عن المكان لضبط التباين:
بجوار ضبط السطوع أو في القائمة، ستجد أيقونة صغيرة أو خيارًا للتباين. انقر عليها أو اضغط على الزر المقابل.
- ضبط التباين يدويًا:
وبالمثل، استخدم جهاز التحكم عن بُعد أو أزرار الشاشة لزيادة أو تقليل التباين تدريجيًا. ستلاحظ أنه مع تغير التباين، تصبح تفاصيل الصورة أكثر وضوحًا. مع ذلك، لا تضبطه على مستوى عالٍ جدًا، وإلا فقد تبدو الصورة قاسية جدًا.
بهذه الطريقة، بخطوتين فقط، ستصبح شاشة LED أكثر سطوعًا ووضوحًا. تذكر أنك قد تحتاج إلى ضبط هذه الإعدادات مجددًا في ظروف إضاءة محيطة مختلفة لضمان راحة الشاشة دائمًا.
إذا كنت لا تزال غير متأكد من كيفية التشغيل، فلا تقلق، تحقق من دليل التعليمات الخاص بالشاشة، أو اتصل بالشخص الذي باع لك الشاشة، فيمكنه مساعدتك في حل المشكلة.
الطريقة 3: تنظيف سطح شاشة LED
تُعد شاشات LED رفيقًا أساسيًا في عملنا اليومي وترفيهنا، ونظافة سطحها لا تقتصر على التأثير البصري فحسب، بل تؤثر أيضًا على عمر الجهاز. فالشاشة النظيفة والمرتبة توفر لنا صورًا أكثر وضوحًا ودقة، كما تُطيل عمر الجهاز.
الخطوة 1: امسح الأوساخ بلطف وأزلها بعناية
- إعداد الأدوات المهنية:
أولاً، عليك تجهيز قطعة قماش خاصة لتنظيف الشاشة، مثل قطعة قماش من الألياف الدقيقة. هذه القطعة ناعمة ورقيقة، ولا تخدش سطح الشاشة، وتمتص الغبار والبقع بفعالية.
- امسح الشاشة برفق:
استخدم قطعة قماش التنظيف المُجهزة، وابدأ من أحد أركان الشاشة، ثم امسح الشاشة بأكملها تدريجيًا بقوة خفيفة. أثناء المسح، احرص على نظافة قطعة القماش لتجنب انتقال الغبار والبقع من مكان إلى آخر.
- نصائح لإزالة البقع العنيدة:
إذا واجهت بقعًا عنيدة يصعب إزالتها، مثل بصمات الأصابع وبقع الزيت وما إلى ذلك، فيمكنك غمس القليل من الماء النظيف على قطعة قماش التنظيف (تذكر أن تعصر قطعة القماش لمنع قطرات الماء من الدخول إلى داخل الشاشة).
بعد ذلك، امسح البقعة برفق. بعد المسح، استخدم فورًا قطعة قماش جافة لامتصاص الرطوبة ومنع الرطوبة المتبقية من إتلاف الشاشة.
الخطوة 2: الابتعاد عن المنظفات الكيميائية وحماية سلامة الشاشة
- فهم مخاطر المنظفات الكيميائية:
تتمتع المنظفات الكيميائية، مثل الكحول والأمونيا، بقدرات إزالة تلوث قوية، إلا أنها قد تُسبب تآكل سطح الشاشة. قد تُتلف هذه المنظفات طبقة الطلاء على سطح الشاشة، مما يُؤدي إلى تشويشها أو ظهور بقع عليها، بل ويؤثر على جودة الصورة وعمرها الافتراضي.
- اختر منظفًا خاصًا:
لضمان سلامة الشاشة، يُنصح باختيار منظف مُصمم خصيصًا لها. عادةً ما يكون هذا النوع من المنظفات لطيفًا ولا يُلحق الضرر بسطح الشاشة. قبل الاستخدام، يُرجى قراءة تعليمات المنظف بعناية للتأكد من فهمك لكيفية استخدامه واحتياطاته.
- اختبار توافق مادة التنظيف:
قبل استخدام أي مُنظف، يُنصح باختباره على مساحة صغيرة في مكان غير ظاهر. تأكد من أن المُنظف لن يُسبب أي ضرر للشاشة قبل الاستخدام الكامل. مع أن هذه الخطوة قد تبدو مُرهقة، إلا أنها ضرورية لحماية سلامة الشاشة.
الخطوة 3: الاحتياطات بعد التنظيف
- قم بإيقاف تشغيل الطاقة والتأكد من السلامة:
قبل تنظيف الشاشة، افصلها دائمًا عن الكهرباء وافصلها عن الكهرباء. هذا ليس فقط لمنع خطر الصدمات الكهربائية، بل أيضًا لضمان عدم تلف المكونات الإلكترونية داخل الشاشة أثناء التنظيف.
- تجنب استخدام القماش الخشن أو الأشياء الصلبة:
عند تنظيف الشاشة، تجنب استخدام قطعة قماش خشنة أو أشياء صلبة لمسح سطحها. فقد تخدش هذه الأشياء الشاشة، مما قد يُسبب خدوشًا أو تلفًا لسطحها.
- قم بتنظيفه بانتظام للحفاظ عليه في أفضل حالة:
لضمان نظافة الشاشة وفعاليتها، يُنصح بتنظيفها بانتظام. بشكل عام، يُنصح بتنظيفها مرة واحدة على الأقل شهريًا. أثناء التنظيف، احرص على إبقاء قطعة قماش التنظيف نظيفة ورطبة، وتجنب الإفراط في استخدام الماء أو المنظفات الكيميائية.
بفضل خطوات التنظيف والصيانة الشاملة والدقيقة المذكورة أعلاه، ستبقى شاشة LED الخاصة بك دائمًا في أفضل حالاتها، مما يمنحك تجربة بصرية أكثر وضوحًا ودقة. تذكر أن التنظيف المنتظم والصيانة المناسبة هما مفتاح إطالة عمر الشاشة والحفاظ على جودة عرضها.
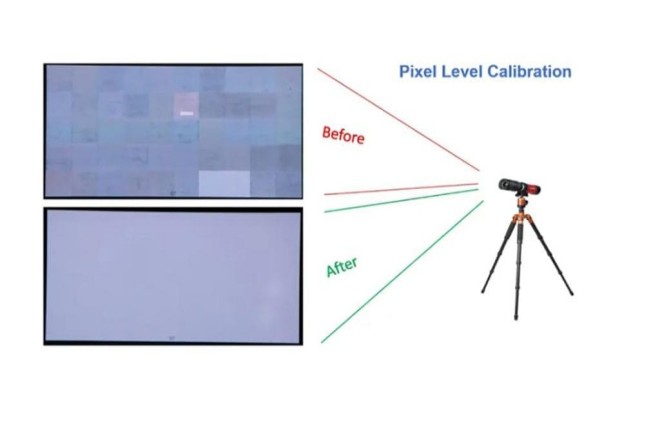
الطريقة 4: التحقق من شاشة LED ومعايرة إعدادات الألوان

هل ترغب في جعل ألوان شاشة LED الخاصة بك أكثر واقعية وجاذبية؟ عليك إذًا تعلم كيفية معايرة الألوان! لا تقلق، هذه العملية سهلة. اتبع الخطوات التالية لتصبح خبيرًا في معايرة الألوان!
1) تحقق من لون الشاشة أولاً
- افتح الإعدادات
ابحث عن لوحة التحكم أو قائمة الإعدادات لشاشة LED. فهي بمثابة عقل الشاشة، حيث تتحكم في كيفية عرض الألوان.
- تحقق من إعدادات اللون.
في الإعدادات، ابحث عن خيارات متعلقة بالألوان، مثل سطوع الألوان الأساسية الثلاثة: الأحمر والأخضر والأزرق، وقيمة جاما اللونية. تحدد هذه الإعدادات كيفية عرض الألوان على الشاشة.
- إلق نظرة على التأثير الفعلي.
ضع بعض الصور أو مقاطع الفيديو الملونة على الشاشة وشاهد ما إذا كان هناك أي خطأ في الألوان على الشاشة، مثل أن تكون الألوان فاتحة جدًا، أو داكنة جدًا، أو أن الألوان خاطئة.
2) اضبط الألوان باستخدام أداة المعايرة
- العثور على أداة المعايرة
تُباع أدوات معايرة الألوان عبر الإنترنت أو في المتاجر، وتُساعدك على ضبط ألوان الشاشة بدقة أكبر. ما عليك سوى اختيار أداة ذات سمعة طيبة وسهولة في الاستخدام.
- قم بتوصيل الأداة والبدء.
وصّل أداة المعايرة بجهاز التحكم أو شاشة العرض (يجب أن تكون مدعومة). ثم افتح برنامج أداة المعايرة واتبع تعليماته خطوة بخطوة.
- ضبط السطوع والتباين وما إلى ذلك.
سيطلب منك البرنامج ضبط السطوع والتباين وتوازن الألوان. ما عليك سوى اتباع تعليمات البرنامج، ومشاهدة التغييرات على الشاشة، وضبط الإعدادات حتى تشعر براحة أكبر تجاه اللون.
- حفظ الإعدادات
بعد الضبط، لا تنسَ حفظ الإعدادات! بهذه الطريقة، عند تشغيل الشاشة التالية، سيتم تطبيق إعدادات الألوان التي عدّلتها تلقائيًا.
3) ملاحظات
- المعايرة المنتظمة
بعد استخدام الشاشة لفترة طويلة، قد يتغير لونها قليلاً. لذا، تذكّر معايرتها بانتظام للحفاظ على دقة اللون.
- لا تدع الأشياء الأخرى تتدخل.
عند المعايرة، من الأفضل عدم السماح لمصادر الضوء أو الأشياء الأخرى بالتداخل مع العرض حتى تكون نتيجة المعايرة أكثر دقة.
- إذا كنت لا تعرف كيفية طلب المساعدة
إذا كنت تعتقد أن المعايرة صعبة للغاية، أو لم تكن راضيًا عن نتائج المعايرة، يمكنك الاستعانة بخدمة معايرة ألوان احترافية. يمتلكون أدوات وخبرة أكثر احترافية، ويمكنهم مساعدتك في ضبط ألوان الشاشة بدقة أكبر.
حسنًا، باتباع الخطوات المذكورة أعلاه، يمكنك بسهولة معايرة ألوان شاشة LED! اجعل ألوان شاشتك أكثر واقعية وتجربة مشاهدة أفضل! مع ذلك، تجدر الإشارة إلى أن معايرة وضبط ألوان شاشة LED أكثر احترافية. إذا لم تتمكن من إتمامها، فتذكر طلب المساعدة من متخصصين!
الطريقة 5: التحقق مما إذا كانت أجهزة شاشة LED في حالة طبيعية
شاشات LED جهاز شائع الاستخدام في حياتنا، تُستخدم لعرض معلومات متنوعة، مثل الإعلانات والفيديوهات، وغيرها.
لضمان عمل شاشة LED بشكل صحيح وعرضها بشكل جيد، يجب فحص مكوناتها وصيانتها بانتظام. سأشرح أدناه، باستخدام لغة بسيطة وسهلة الفهم، كيفية فحص مكونات شاشة LED وصيانتها بالتفصيل.
1) تحقق من شاشة LED الشاملة أولاً
- قم بتشغيل العرض
شغّل شاشة LED أولاً للتأكد من عملها بشكل صحيح. راقب التأثير العام للشاشة، وتأكد من عدم وجود أي خلل، مثل لون غير صحيح، أو عدم سطوع جزء من الشاشة، أو عدم وضوحها.
- الحكم الأولي
إذا كانت الشاشة جيدة، فاستمر في استخدامها. ولكن إذا لاحظت أي خلل، مثل لون غير طبيعي أو عدم سطوع جزء من الشاشة، فعليك فحصها مرة أخرى.
2) تحقق بعناية من قاد وحدة
- انظر عن كثب
اذهب إلى الشاشة، واقترب منها، وراقب كل وحدة LED بعناية. وحدات LED هي تلك الشبكات الصغيرة، التي تحتوي كل منها على العديد من حبات المصباح الصغيرة.
- البحث عن الوحدات التالفة
تحقق من وجود أي وحدات بها خرزات مصباح متساقطة، أو محترقة، أو ألوان غير متساوية. قد تكون هذه الوحدات سبب عدم وضوح الشاشة.
- مشاكل التسجيل
إذا وجدتَ أيَّ وحداتٍ بها مشاكل، تذكَّر تسجيل موقعها، ودرجة الضرر، وكميته. هذا يُسهِّل استبدالها لاحقًا.
3) استبدال الأجزاء التالفة
- تحضير أجزاء جديدة
بناءً على المشاكل المذكورة سابقًا، جهّز العدد والطراز المناسبين من وحدات LED البديلة. تذكر شراء وحدات عالية الجودة لضمان جودة العرض وعمرها الافتراضي.
- افصل الطاقة
قبل استبدال الأجزاء، تأكد من إيقاف تشغيل الطاقة الخاصة بالشاشة لضمان السلامة.
- إزالة القديم واستبدال الجديد.
استخدم الأدوات المناسبة لإزالة وحدة LED التالفة بعناية. احرص على عدم إتلاف الوحدات والدوائر المحيطة. ثم ثبّت الوحدة الجديدة في مكانها ومسارها الأصليين.
- التحقق من التثبيت
بعد التثبيت، تأكد بعناية من تثبيت كل وحدة بإحكام دون أي ارتخاء أو فجوات.
- اختبار التأثير
شغّل الشاشة مرة أخرى واختبر أداء وحدة LED الجديدة. إذا استمرت المشكلة، فتحقق مرة أخرى للتأكد من عدم وجود أي عطل أو تلف في الوحدات الأخرى.
4) الاحتياطات
- السلامة أولاً
عند فحص الأجهزة واستبدالها، تأكد من إيقاف تشغيل الطاقة أولاً لضمان سلامتك.
- كن حذرا وصبرًا.
كن حذرًا عند الفحص، ولا تغفل عن أي نقاط ضعف محتملة. تحلَّ بالصبر عند استبدال الأجزاء، وتجنب إتلاف أي أجهزة أخرى.
- الإصلاح في الوقت المناسب
إذا وجدتَ مشكلة، فعليكَ إصلاحها في الوقت المناسب. لا تُؤخّرها، فقد تُسبّب ضررًا أكبر أو تُؤثّر على جودة العرض.
- اطلب المساعدة
إذا كنت لا تعرف كيفية فحص أو استبدال الأجهزة بنفسك، يمكنك الاستعانة بفني إصلاح محترف. يمتلكون أدوات احترافية وخبرة واسعة لحل المشكلة بشكل أفضل.
الطريقة 6: ضبط مسافة الرؤية وزاوية شاشة LED

هل ترغب في الحصول على أفضل تجربة مشاهدة لشاشة LED؟ ضبط مسافة وزاوية المشاهدة هو الحل الأمثل! لنتحدث الآن بالتفصيل عن كيفية ضبطها لتحسين تجربة المشاهدة.
1). ضبط عرض المسافة وإيجاد أفضل زاوية للعرض
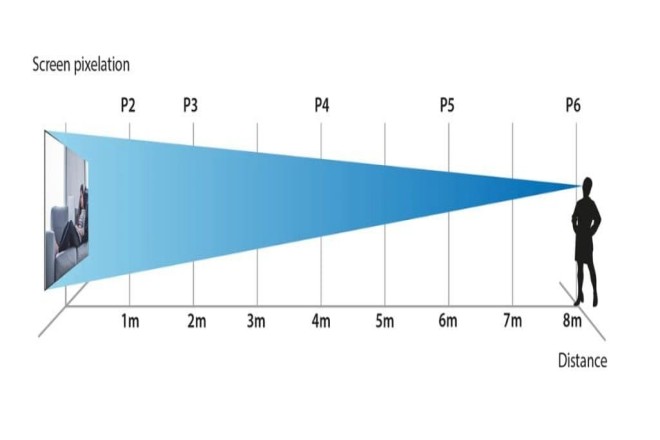
1.1). ما هي أفضل مسافة للمشاهدة؟
أفضل مسافة مشاهدة هي المسافة التي تتيح لك رؤية أوضح صورة وأكثرها واقعية على الشاشة. إذا كانت المسافة قريبة جدًا، فقد تبدو الصورة هشة للغاية، وقد تتعب عيناك بسهولة؛ وإذا كانت المسافة بعيدة جدًا، فقد لا تكون التفاصيل واضحة.
1.2). كيفية العثور على أفضل مسافة للمشاهدة؟
تحقق من دليل المنتج: سيوضح دليل المنتج الخاص بمعظم شاشات LED نطاق أفضل مسافة للمشاهدة، وهو ما يعد مرجعًا جيدًا.
الاختبار الفعلي: يمكنك أيضًا تحديد المسافة الأنسب لك من خلال المشاهدة الفعلية. قف في أوضاع مختلفة ولاحظ أي مسافة تكون الصورة عندها أوضح وأكثر راحة.
1.3). تعديل وضعك
بعد العثور على أفضل مسافة للمشاهدة، اضبط موضعك وتأكد من مشاهدة العرض ضمن هذه المسافة!
2) اضبط زاوية العرض لتجنب تشويه الصورة
2.1). ما هي أفضل زاوية للرؤية؟
أفضل زاوية رؤية هي الزاوية التي تتيح لك رؤية ألوان الشاشة بدقة وتناسق. إذا كانت الزاوية غير صحيحة، فقد تتشوه الصورة، مما يؤدي إلى انحراف الألوان ومشاكل أخرى.
2.2). كيفية العثور على أفضل زاوية للرؤية؟
لاحظ العرض: قف أمام الشاشة، وحرك رأسك إلى اليسار واليمين، ولاحظ أداء الصورة من زوايا مختلفة.
العثور على أفضل زاوية: ابحث عن الزاوية ذات اللون الأكثر دقة وتوحيدًا، والتي تعد زاوية المشاهدة الأفضل بالنسبة لك!
2.3). ضبط زاوية المشاهدة الخاصة بك.
إن أمكن، اضبط زاوية رؤيتك لضمان مشاهدة الشاشة من هذه الزاوية المثالية. إذا كانت الشاشة ثابتة، يمكنك أيضًا تعديل وضعيتك أو وضعية جلوسك للحصول على أفضل زاوية رؤية.
3) ملاحظات
الإضاءة المحيطة: عند المشاهدة، انتبه لشدة الإضاءة المحيطة. قد يؤدي الضوء القوي جدًا إلى انعكاس الصورة على الشاشة وجعلها غير واضحة، بينما قد يؤدي الضوء الضعيف جدًا إلى جعل الشاشة تبدو باهتة جدًا.
جودة العرض: قد تختلف مسافة وزاوية الرؤية المثلى لشاشات LED باختلاف العلامات التجارية والطرازات. لذلك، عند الشراء، يجب فهم معايير أداء المنتج بوضوح.
العادات الشخصية: لكل شخص عادات رؤية مختلفة. البعض يُفضل النظر عن قرب، والبعض الآخر يُفضل النظر بعيدًا، والبعض الآخر يُفضل النظر مباشرةً، والبعض الآخر يُفضل النظر بزاوية. لذلك، عند ضبط مسافة وزاوية الرؤية، يجب عليك أيضًا مراعاة عاداتك الشخصية!
بضبط مسافة وزاوية المشاهدة، يمكنك الاستمتاع بتجربة مشاهدة أكثر وضوحًا وواقعية لشاشة LED. تذكر، اختر مسافة وزاوية المشاهدة الأنسب لك لراحة عينيك ومتعة أكبر!
خاتمة
باتباع الخطوات البسيطة المذكورة أعلاه، يمكنك تحسين جودة عرض شاشة LED بشكل ملحوظ. هذه الطرق سهلة الاستخدام ولا تتطلب معرفة تقنية معقدة. إذا لم تتمكن هذه الطرق من حل المشكلة، فمن الحكمة طلب الدعم الفني المتخصص.
أخيرًا، إذا كنت تريد معرفة المزيد عن شاشات LED، يرجى الحصول على اتصال معنا.
