
قبل استخدام الهواتف المحمولة للتحكم في شاشات LED رسميًا، يجب القيام بسلسلة من التحضيرات لضمان سير عملية التحكم بسلاسة. فيما يلي خطوات التحضير المفصلة:
1) تأكد من توافق الجهاز
- توافق شاشة العرض LED:
أولاً، عليك التأكد من أن شاشة العرض LED الخاصة بك تدعم اتصال الشبكة اللاسلكية.
وهذا يعني أن شاشة العرض تحتاج إلى أن تكون مجهزة بوحدة استقبال لاسلكية أو بطاقة تحكم لاسلكية حتى تتمكن من التواصل مع الأجهزة الخارجية عبر طرق لاسلكية مثل Wi-Fi.
تأكد من أن إصدار البرنامج الثابت أو البرنامج الخاص بشاشة العرض LED هو الأحدث للحفاظ على أفضل توافق مع برنامج Viplex Handy.
- توافق الهاتف المحمول:
تحقق مما إذا كان طراز هاتفك المحمول مدرجًا في قائمة دعم برنامج Viplex Handy. بشكل عام، معظم الهواتف الذكية الشائعة (مثل هواتف iOS وAndroid) متوافقة مع البرنامج.
تأكد من أن نظام التشغيل الخاص بهاتفك هو الإصدار الأحدث للحصول على الأداء والأمان الأمثل.
2) اتصال الشبكة
- إعدادات جهاز التوجيه اللاسلكي:
تأكد من تشغيل جهاز التوجيه اللاسلكي لديك، واستقرار إشارة الشبكة. إن أمكن، حاول وضع جهاز التوجيه اللاسلكي بالقرب من شاشة LED والهاتف لتقليل ضعف الإشارة.
قم بتعيين اسم شبكة لاسلكية (SSID) وكلمة مرور آمنة وسهلة التذكر حتى تتمكن من إدخالها بسرعة ودقة أثناء الاتصالات اللاحقة.
- اتصال الجهاز:
قم بتوصيل جهاز الاستقبال اللاسلكي الخاص بشاشة LED بمصدر الطاقة وتأكد من تكوينه بشكل صحيح للاتصال بشبكتك اللاسلكية.
افتح إعدادات Wi-Fi على هاتفك، وابحث عن اسم الشبكة اللاسلكية التي حددتها مسبقًا وحدده، ثم أدخل كلمة المرور للاتصال. تأكد من اتصال كلٍّ من الهاتف وشاشة LED بالشبكة اللاسلكية نفسها.
3) قم بتنزيل وتثبيت Viplex Handy
- تنزيل البرنامج:
افتح متجر التطبيقات على هاتفك (مثل متجر تطبيقات Apple أو متجر Google Play).
أدخل "Viplex Handy" في مربع البحث للبحث.
ابحث عن زر التنزيل وانقر عليه وانتظر حتى يتم تنزيل البرنامج.
- التثبيت والتسجيل:
بعد التنزيل، انقر فوق زر التثبيت لبدء تثبيت برنامج Viplex Handy.
أثناء عملية التثبيت، يرجى اتباع الإرشادات التي تظهر على الشاشة.
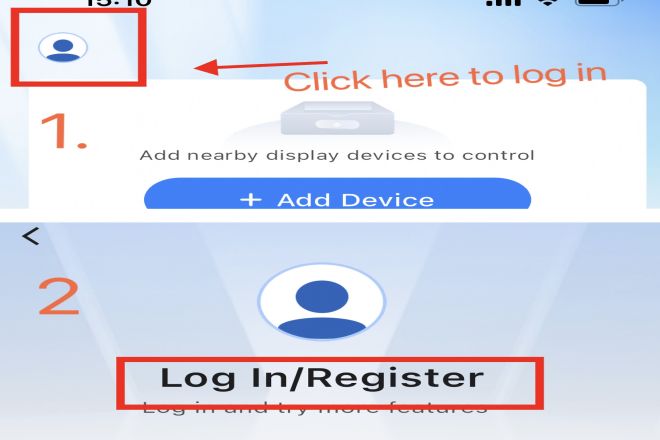
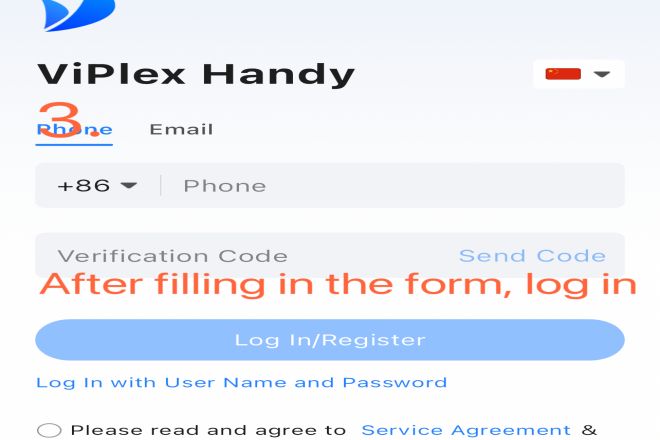
بعد اكتمال التثبيت، افتح برنامج Viplex Handy. إذا كانت هذه هي المرة الأولى التي تستخدمه فيها، فقد تحتاج إلى التسجيل أو تسجيل الدخول وفقًا لتعليمات البرنامج. إذا كان لديك حساب بالفعل، فما عليك سوى تسجيل الدخول مباشرةً.
بعد إتمام هذه التحضيرات، يمكنك البدء باستخدام برنامج Viplex Handy للتحكم في شاشة LED. بعد ذلك، سننتقل إلى خطوات إعدادات البرنامج وإقران الجهاز.
بعد الانتهاء من التحضيرات، تأتي الخطوة التالية وهي ضبط برنامج Viplex Handy وربط جهاز عرض LED. هذه هي الخطوة الأساسية للتحكم في شاشة LED عبر الهاتف المحمول.
1). افتح Viplex Handy
شغّل هاتفك، وابحث عن أيقونة تطبيق Viplex Handy وانقر عليها للدخول إلى الواجهة الرئيسية للبرنامج. قد ترى على الواجهة الرئيسية بعض خيارات التشغيل الأساسية وشاشات عرض الحالة.
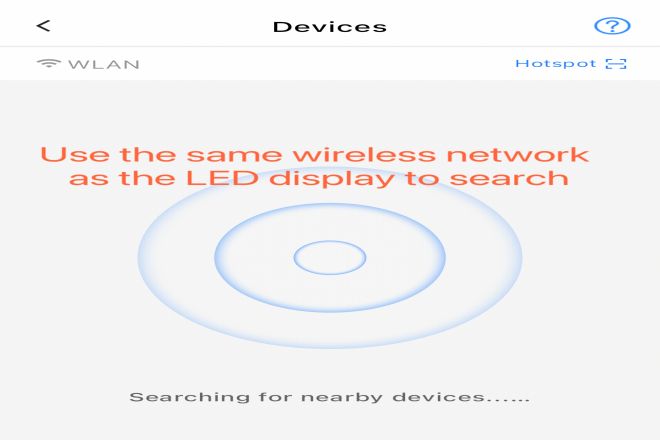
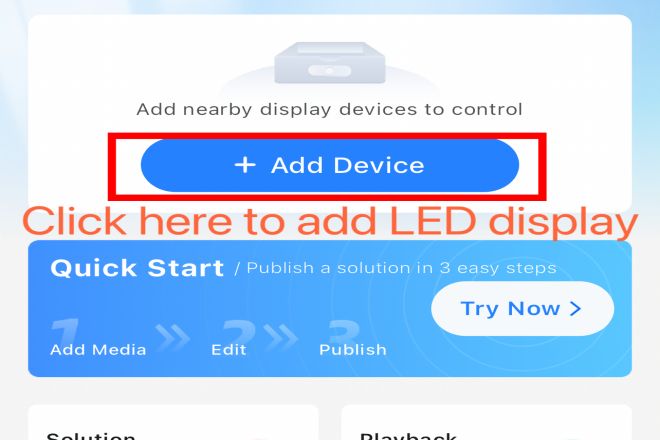
2) البحث عن الأجهزة وإقرانها
- البحث عن الأجهزة:
في الواجهة الرئيسية لبرنامج Viplex Handy، ابحث عن "بحث عن جهاز" أو "اكتشاف الأجهزة" أو أي أزرار مشابهة وانقر عليها. سيبدأ البرنامج تلقائيًا بفحص جميع الأجهزة المتصلة حاليًا بالشبكة اللاسلكية نفسها، بما في ذلك شاشة LED.
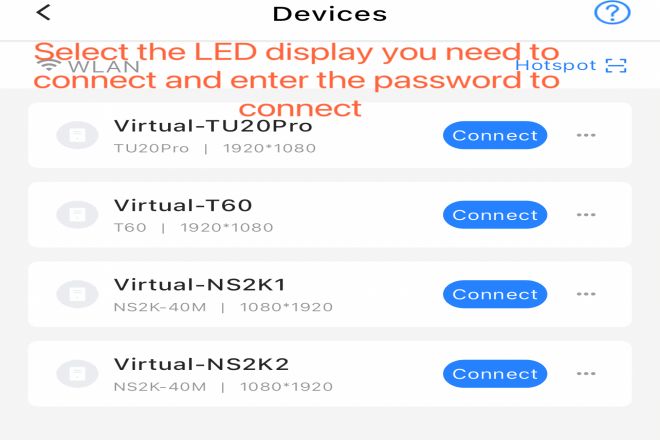
- حدد الجهاز:
بعد المسح، سيعرض البرنامج جميع الأجهزة التي تم العثور عليها. اختر جهاز شاشة LED من القائمة. يُرجى العلم أن اسم الجهاز، وطرازه، وعنوان IP، ومعلومات أخرى قد تظهر في قائمة الأجهزة لمساعدتك في تحديده.
- الاقتران:
بعد اختيار الجهاز، انقر على زر "اقتران" أو "اتصال" لبدء عملية الاقتران. بناءً على إعدادات جهاز عرض LED، قد تحتاج إلى إدخال عنوان IP أو كلمة المرور للجهاز (إذا كان الجهاز مُفعّلاً للتحكم في الوصول).
إذا لم يكن للجهاز كلمة مرور محددة، أو كنت تعرف كلمة المرور بالفعل، فما عليك سوى إدخال المعلومات المقابلة في البرنامج.
إذا كان الجهاز يتطلب طريقة اقتران محددة (مثل من خلال مسح رمز الاستجابة السريعة، أو الاقتران عبر البلوتوث، وما إلى ذلك)، فيرجى اتباع دليل الجهاز أو تعليمات البرنامج.
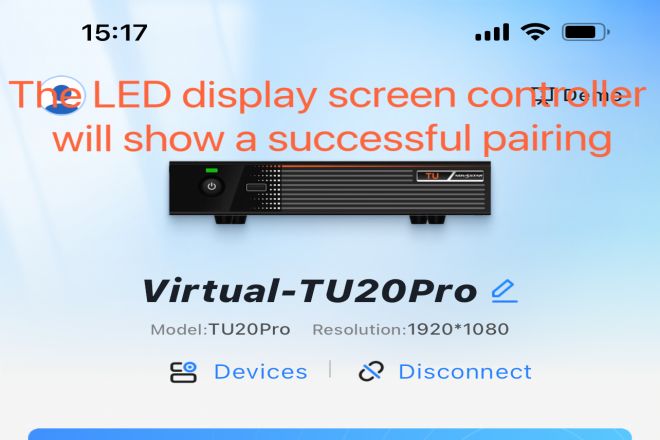
- نجاح الاقتران:
بمجرد نجاح عملية الاقتران، سيتم عرض جهاز العرض LED الخاص بك على الواجهة الرئيسية لبرنامج Viplex Handy، وعادةً ما يتم عرض رمز حالة الاتصال (مثل علامة اختيار خضراء، أو كلمة متصل، وما إلى ذلك)، مما يشير إلى أنه تم إنشاء الاتصال بين الجهاز والبرنامج.
الآن، تم إقران برنامج Viplex Handy بنجاح مع شاشة LED. بعد ذلك، يمكنك البدء باستخدام وظائف البرنامج لتحرير المحتوى وإرساله إلى شاشة LED.
بعد إكمال إعدادات البرنامج وإقران الجهاز، يمكنك البدء بتحرير المحتوى وإرساله إلى شاشة LED. إليك الخطوات التفصيلية:
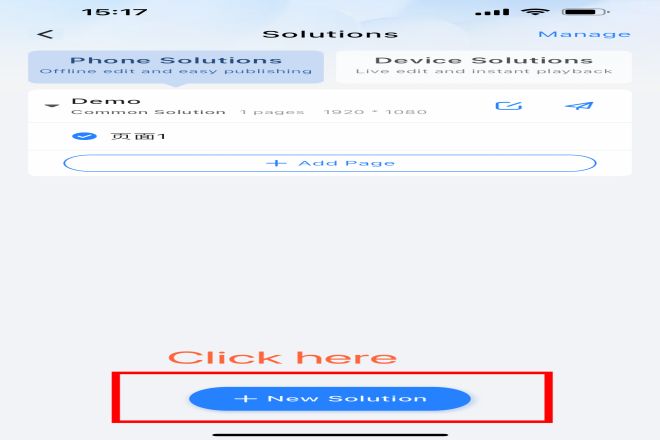
1) تحرير المحتوى
- أدخل إلى واجهة التحرير:
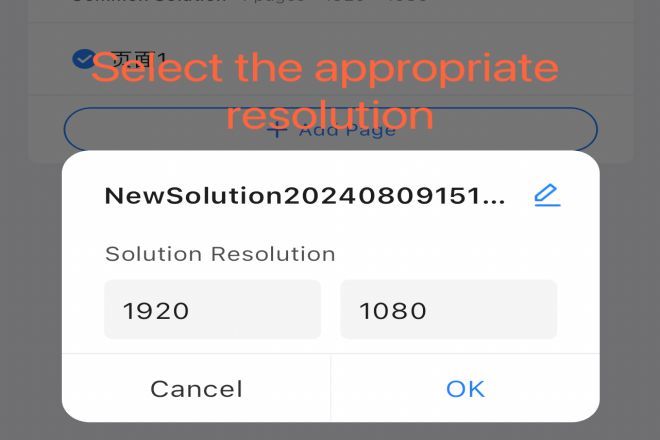
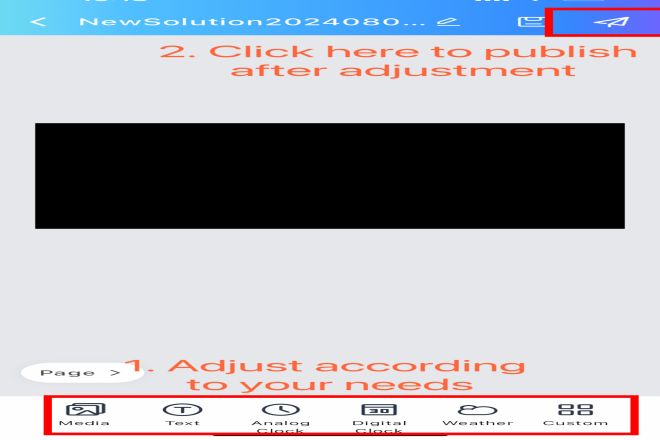
في الواجهة الرئيسية لبرنامج Viplex Handy، ابحث عن "تحرير المحتوى" أو "محتوى جديد" أو أي خيارات مشابهة وانقر عليها. سيؤدي هذا إلى فتح واجهة تحرير جديدة لإنشاء وتحرير المحتوى لعرضه على شاشة LED.
- إضافة المحتوى:
في واجهة التحرير، يمكنك اختيار إضافة أنواع متعددة من المحتوى، مثل النصوص والصور ومقاطع الفيديو، وما إلى ذلك. يتم ذلك عادةً بالنقر على الأزرار أو الأيقونات المقابلة، مثل "إضافة نص" و"إدراج صورة"، وما إلى ذلك.
بالنسبة لمحتوى النص، يمكنك استخدام أدوات التحرير التي يوفرها البرنامج للطباع، بما في ذلك تحديد الخط، وتعديل حجم الخط، وتعيين اللون، وما إلى ذلك. تأكد من أن محتوى النص واضح وسهل القراءة ويلبي احتياجات العرض الخاصة بك.
يمكن أيضًا تحرير الصور ومحتوى الفيديو، مثل القص، والتدرج، وضبط سرعة التشغيل، وما إلى ذلك. تأكد من أن الصور ومقاطع الفيديو المحددة ذات جودة عالية ومرتبطة بالموضوع.
- المعاينة والتعديل:
بعد التحرير، استخدم ميزة المعاينة التي يوفرها البرنامج لعرض التأثير العام للمحتوى. يساعدك هذا على تحديد المشاكل المحتملة وإجراء التعديلات اللازمة، مثل أخطاء الطباعة وعدم تناسق الألوان.
من خلال المعاينة، تأكد من أن المحتوى يلبي متطلباتك ومناسب للعرض على شاشة LED.
2) إرسال المحتوى إلى شاشة LED
- إرسال المحتوى:
بعد تحرير المحتوى ومعاينته بما يرضيك، انقر على "إرسال" أو "معاينة للعرض" أو أي أزرار مشابهة. سيؤدي هذا إلى إرسال البرنامج للمحتوى إلى شاشة LED المقترنة مسبقًا.
اعتمادًا على سرعة الشبكة لديك ووقت استجابة الشاشة، قد يتم عرض المحتوى على شاشة LED خلال بضع ثوانٍ إلى بضع دقائق.
- المراقبة في الوقت الحقيقي:
بعد إرسال المحتوى، يمكنك مراقبة شاشة LED آنيًا عبر واجهة برنامج Viplex Handy. يساعدك هذا على التأكد من إرسال المحتوى وعرضه بشكل صحيح.
إذا تم العثور على أي مشاكل (مثل عرض المحتوى غير الكامل، أو عدم المحاذاة، وما إلى ذلك)، فيمكنك تعديلها على الفور في البرنامج وإعادة إرسال المحتوى.
- إدارة قوائم التشغيل:
يدعم برنامج Viplex Handy عادةً إدارة قوائم تشغيل متعددة. يمكنك إنشاء قوائم تشغيل مختلفة لتنظيم مجموعات المحتوى المختلفة، وتبديل قوائم التشغيل حسب الحاجة للتحكم في محتوى شاشة LED.
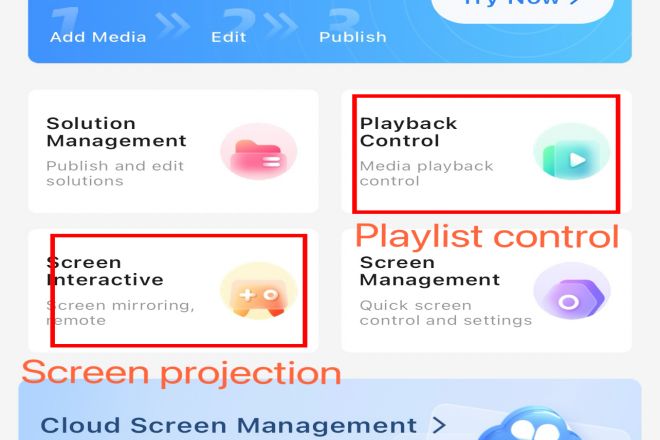
لا يوفر Viplex Handy وظائف أساسية لتحرير المحتوى وإرساله فحسب، بل يتضمن أيضًا مجموعة من الوظائف والإعدادات المتقدمة لتلبية احتياجات المستخدمين المتنوعة في مختلف السيناريوهات. إليك شرح مفصل لهذه الميزات والإعدادات المتقدمة:
1) تعديل المعلمات
- سطوع والتباين:
في قائمة الإعدادات الخاصة بـ Viplex Handy، يمكنك العثور على خيارات لضبط سطوع وتباين شاشة LED.
وفقًا للتغيرات في الإضاءة المحيطة أو التفضيلات الشخصية، فإن التعديل المناسب لهذه المعلمات يمكن أن يجعل تأثير العرض أكثر وضوحًا وراحة.
- سرعة التشغيل:
للمحتوى الذي يحتوي على رسوم متحركة أو ترجمات متحركة، يتيح لك تطبيق Viplex Handy ضبط سرعة التشغيل. سواءً بتسريعها أو إبطائها، يُمكنك عرض المحتوى بشكل أكثر ملاءمةً لاحتياجاتك.
- المعلمات الأخرى:
بالإضافة إلى السطوع والتباين وسرعة التشغيل، قد يدعم Viplex Handy أيضًا تعديل معلمات أخرى، مثل درجة حرارة اللون وتشبع اللون وما إلى ذلك.
إن تعديل هذه المعلمات يمكن أن يعزز تأثير العرض بشكل أكبر ويجعل المحتوى أكثر حيوية وواقعية.
2) التشغيل المجدول
- تعيين مهمة مجدولة:
تتيح لك وظيفة التشغيل المجدول في Viplex Handy ضبط فترات زمنية متعددة مسبقًا ومحتوى التشغيل المقابل. عند حلول الوقت المحدد، ستنتقل شاشة LED تلقائيًا إلى المحتوى المحدد مسبقًا للتشغيل.
هذه الوظيفة مناسبة جدًا للأماكن التي تحتاج إلى تحديث المعلومات أو تشغيل الإعلانات بانتظام، مثل مراكز التسوق، محطات السكك الحديدية، وما إلى ذلك.
من خلال التشغيل المجدول، يمكنك توفير قدر كبير من الموارد البشرية والمادية مع ضمان التوقيت ودقة المعلومات.
3) إدارة الشاشات المتعددة
- التحكم في شاشات متعددة في وقت واحد:
إذا كان سيناريو التطبيق الخاص بك يتضمن التحكم في شاشات LED متعددة، فإن وظيفة إدارة الشاشات المتعددة في Viplex Handy ستوفر لك راحة كبيرة.
باستخدام هذه الوظيفة، يمكنك توصيل شاشات متعددة والتحكم فيها في نفس الوقت لتحقيق التشغيل المتزامن أو التحكم المستقل في المحتوى.
في واجهة إدارة الشاشات المتعددة، يمكنك رؤية حالة كل شاشة واتصالها بوضوح، وإدارتها في مجموعات. يساعدك هذا على تنظيم وإدارة محتوى العرض على شاشات متعددة بشكل أفضل، ويحسّن كفاءة العمل.
- ميزات متقدمة أخرى
بالإضافة إلى الوظائف المذكورة أعلاه، قد يتضمن Viplex Handy أيضًا ميزات متقدمة أخرى مثل التحكم عن بعد وتشخيص الأخطاء وترقية البرامج الثابتة وما إلى ذلك. إن وجود هذه الميزات يجعل Viplex Handy برنامجًا قويًا وسهل الاستخدام للتحكم في شاشات LED.
من خلال التعلم المستمر وإتقان هذه الميزات المتقدمة، سوف تكون قادرًا على الاستفادة الكاملة من إمكانات Viplex Handy وجلب المزيد من الاحتمالات والابتكارات إلى شاشة العرض LED الخاصة بك.